Showing posts with label cupcake. Show all posts

Cake mix extender recipe

Tuesday, November 6, 2012

'Tis the season to make cupcakes and cakes.  I'm sure that a lot of you have classroom parties at school for the next couple months with all the holidays coming up.  But what happens when there is 32 kids in your child's class?  A cake mix only claims to make 24 cupcakes.  So do you bake two boxes of cake mix?  No!  Use the cake mix extender recipe!  This is a recipe that takes the basic cake mix a little bit further. I was able to make 36 cupcakes.  That's 50% more than the regular cake mix.  Or you can make 2 9x13 cakes (just not as high)  Plus I think the cake is just a little bit denser as well.  This recipe is all over the internet, but I've had friend ask for the recipe, so I thought I'd post it here.  (Or maybe it's more for me just in case I ever lose my original piece of paper)
Click here for printable recipe.


Ingredients:

 1 cake mix of choice PLUS all the ingredients listed on the box (eggs, oil, water)
Add:
1 c flour
1 c sugar
1 tsp baking powder
1 pkg instant pudding mix , small size (make sure you pick the flavor of pudding the matches the flavor of your cake)
1 egg
1/2 c water
1 tsp vanilla

The Directions:
Mix all the dry ingredients into a bowl.  (the cake mix, and all the extra dry ingredients)
 Now add all the wet ingredients.  Both what is listed on the box PLUS what to add.
 Mix well for a couple minutes with an electric beater.  Scrape down the sides periodically.
 Pour into desired baking pans.  Here I made cupcakes for a Halloween party.
 Follow the directions on the box for how long to bake and the temperature.  (usually 325-250 degrees for about 18 minutes).  See, this made 36 cupcakes with one cake mix box!

I was helping with a cupcake decorating activity at a Halloween party.  Here are some of the cupcakes that the kids made.  I guess with a large supply of sprinkles and candy, they don't know when to stop.
Here are a couple other ones:


Read more...

HALLOWEEN: Mud and Worm Cupcakes

Tuesday, October 23, 2012

With five kids, I've made a lot of birthday cupcakes for them to share with their classes over the years.  I keep hearing of schools that don't allow homemade food or others that are starting to outlaw treats altogether.  I, for one,  love making fun and creative treats for my kids and would be a very sad mom indeed if they ever outlawed them at our school.  I love doing it so much that I bend over backwards to accommodate their classmates' variety of food allergies, so that everyone possible can enjoy them.  I pretty much never bring nuts into the school, since there always seems to be someone in all their classes that's allergic.  And depending on the other allergies, I can use my milk and egg free cupcake recipe for those with dairy allergies.  I make my very yummy gluten free recipe for those with celiac.   And for the one year that one of my kids was in a classroom with kids with  nut, dairy, and gluten allergies all in the same classroom, I made fun rice krispie treats with butter substitute and gluten free rice krispies from the health food store.   I love seeing how excited the kids with the allergies get when I tell them that they can actually eat the birthday treat I've brought! 

(Don't forget to check out this post for a compilation of all of our favorite fun Halloween ideas in one place!)

For my son's birthday this year, he wanted something fun and Halloweeny!  I was pleased to discover that the only allergy to accommodate in his class this year was nuts...so I broke out a brownie mix to make it easy!

I made the brownies as directed on the package and poured the batter into a lined cupcake pan, baked them for 18-20 minutes, let them cool, and scooped out the centers.
 

then whipped together some instant chocolate pudding and cut the gummy worms in half...
 

then put a spoonful or two of the pudding into the center of each cupcake and added in two worm halves...

Sprinkle some brownie crumbs onto the serving tray and

VOILA!

...it's a super easy, super fun birthday/Halloween treat, which his classmates absolutely loved!
Click here for printable recipe.

Posted by Lara. 

The ingredients:


brownie mix (+ required ingredients to make it)
1 small box instant chocolate pudding (prepared with 1-1/2 cups milk)
1 bag gummy worms, each worm cut in half

Directions:

Makes about 18 cupcakes

Make the brownie mix as directed on the box (I used the directions for "cake-like" brownies).  Add paper cupcake liners to a regular sized muffin pan and fill each about half-filled with brownie batter.  Bake at 350 degrees for 18-20 minutes or until brownie cupcakes test done.  Remove from pan and allow to cool completely.  With the edge of a spoon, scoop out a small circle in the center of each cupcake.  With the back of the spoon, press gently around the edges of the hole to smooth out a bit.  Add a teaspoon or two of pudding (how much you add will depend on how big your holes are) to each hole.  Place two gummy worm halves poking out of each pudding filled hole.  Store in refrigerator until ready to serve.  Makes 18 cupcakes. 
Use scooped out centers to sprinkle over the serving tray to look like dirt.  They're also great stirred into a batch of chocolate chip cookie dough! 


Enjoy! 

Read more...

Red Velvet and Orange Cheesecake Marbled Cupcakes with Chocolate-Cinnamon Cream Cheese Frosting

Friday, June 15, 2012

My baby boy, James, turned two this week.  I can't believe how grown up he is!  To celebrate with him, I decided to make cupcakes so we wouldn't be stuck with all the leftovers that a cake brings.  We were just having a few cousins over and this recipe was perfect because we just ended up with one (that I would never have eaten for breakfast the next morning).  I'm sure James didn't appreciate the deliciousness of the cupcakes, but if I'm going to make something, I want to be able to enjoy it!  This recipe is probably one of the best cupcakes I have ever tasted.  They didn't look great (mostly because of my mistake) but they tasted AMAZING!  I got the cupcake recipe from Restless Chipotle and the frosting recipe here


Click here for printable recipe.
Posted by Katie.

Ingredients:

Red Velvet Cake- 
1/4 cup unsalted butter
1 cup sugar
1 egg
3 Tbsp. Cocoa
4 Tbsp. red food coloring
1 tsp. vanilla
1/2 cup whole milk buttermilk (or substitute)
1 cup plus 2 Tbsp. all-purpose flour
1/2 tsp baking soda
1 1/2 tsp. white vinegar

Orange Cheesecake-
4 oz. cream cheese (not low fat)
2 Tbsp. freshly grated orange peel
1/2 cup sugar
1 egg
1/2 tsp vanilla

Directions:
For the velvet cake- Cream the butter and sugar until fluffy.  Add the egg and vanilla and beat well.
Use a spatula to scrape any butter mixture off the sides of the bowl and mix again until well blended.
In a separate bowl, mix the food coloring and cocoa until a paste forms.  I didn't have quite enough food coloring so I added in a little water to make the paste.
Add the cocoa mixture to the butter mixture until it is evenly blended.  Scrape sides and check for streaks then blend again.
Add 1/4 cup buttermilk, mix.  Add half the flour, mix.  Add the remaining buttermilk, mix, Add the remaining flour, mix.  Now stir in the baking soda and vinegar until blended.

For the cheesecake- Beat together all ingredients until creamy and well-blended.
Do not whip.
Assemble- Place liners in muffin cups.  Fill about 2/3 with red velvet batter.  Add about a tablespoon of cheesecake batter to the top.  DO NOT OVERFILL like I did :)  If you don't overfill, this would probably make about 15 cupcakes.
Bake at 325 for 20-25 minutes, or until toothpick inserted comes out clean.  Below is a picture of what happens if you overfill the cups...
Let cool completely and then make frosting.

Chocolate-Cinnamon Cream Cheese Frosting
Ingredients:
8 oz pkg. cream cheese, softened
1/2 cup butter, softened
2 tsp. vanilla
1/4 tsp. ground cinnamon
1 (16 oz) pkg. powdered sugar
1/4 cup buttermilk (or substitute)

Directions:
Beat first 4 ingredients until creamy.  In a separate bowl, combine powdered sugar and cocoa.  Gradually add  to butter/cream cheese mixture with buttermilk, alternately, beginning and ending with powdered sugar mixture.
Beat at low speed until blended after each addition.  Beat until desired consistency.  For good piping consistency, refrigerate until reached.
Pipe or spread frosting over cupcakes.
Enjoy!

Read more...

Reindeer Cupcakes

Thursday, December 15, 2011

Day 15 of holiday baking features these uber-cute reindeer cupcakes...perfectly timed to help all of us here at Recipe Shoebox celebrate National Cupcake Day today in style.  If you're looking for more gourmet-ish cupcakes, go take a gander at my teen daughter's cupcake blog.  Those Andes Mint Cupcakes she posted today were out-of-this-world! 

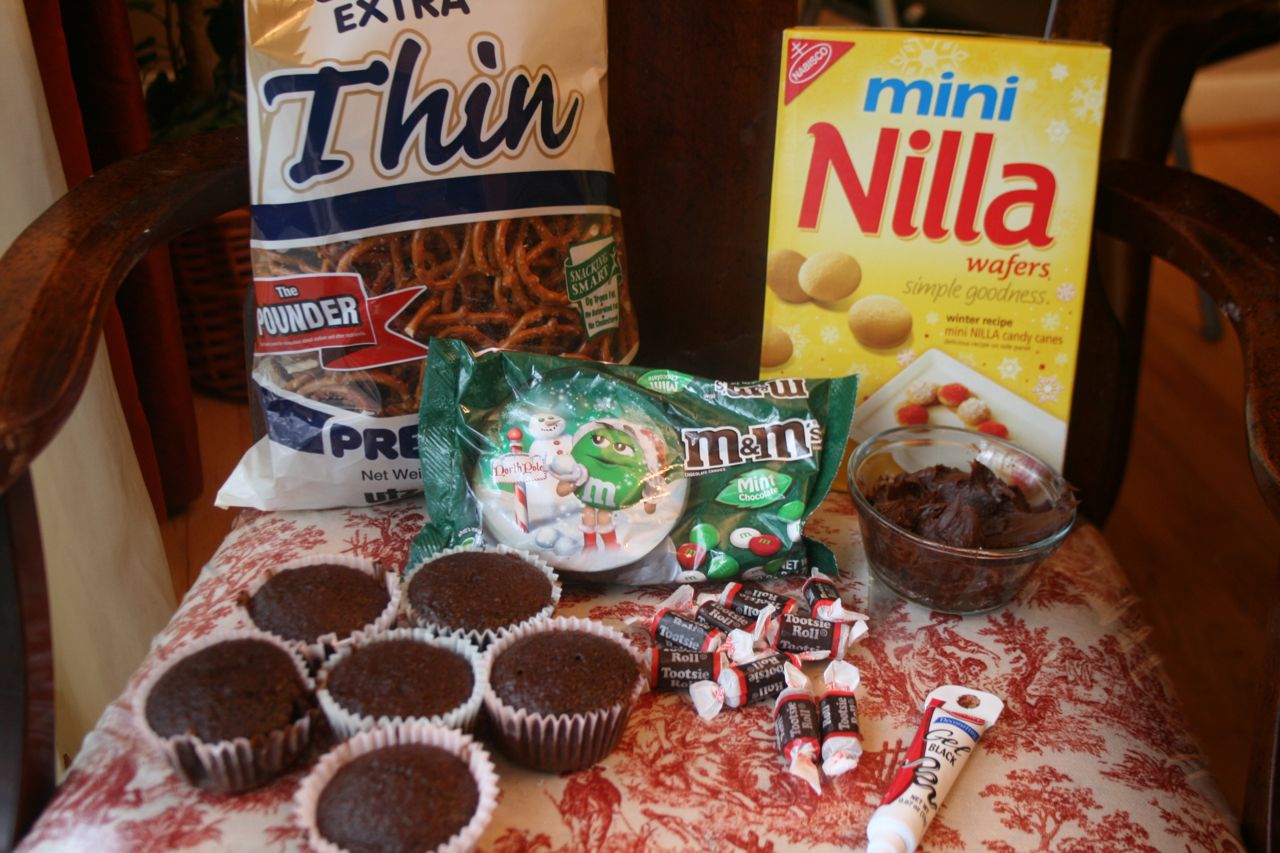
These cute little reindeer fellows were a hit to eat and to make among the little people at our house and I'm thinking they'd be a perfect time-filler for a snowy day (or as a holiday distraction).  They needed help breaking the pretzels correctly, but otherwise made these completely by themselves.  I was worried about the finding the white M&M's for the eyes, but ended up finding them in a bag of holiday mint M&M's that had red, white, and green candies....perfect for this project.  Once again I recommend buying the candy at a drug store like Walgreens.  They have better selection and better prices than a grocery store.   Have fun baking! 

Happy National Cupcake Day!

Recipe Inspiration:  Family Fun
Click here for printable recipe. 


The ingredients (per cupcake): 


one baked cupcake
Chocolate frosting
1 mini vanilla wafers (snout)
1 red or brown M&M (for the nose)
2 large pretzels (antlers) *see note in the directions below
2 white M&M's (look for the holiday mint flavored M&M's or use a white chocolate chip turned upside down)
1 mini tootsie roll (ears)
black decorating gel (eyeball)


Directions:  Generously frost the cupcake with chocolate frosting.

Place the mini vanilla wafer near the bottom center of the cupcake.  Place a small amount of the frosting onto the back of the red or brown M&M and attach it to the top center of the vanilla wafer.  Carefully break pretzels as shown below ( I over-broke several pretzels before I got it just right, so you may want to be prepared with extra pretzels).  

NOTE:  I've drawn lines on the top pretzel, to illustrate where its breaking points are.
Attach the pretzels at the top of the cupcake, pointing diagonally outward. 

After the pretzel antlers are arranged, add the M&M eyes into place (for me it was directly above the vanilla wafer snout). 

Slice the tootsie roll in half lengthwise, then using the warmth of your fingers mold the tootsie roll halves into ear shapes. 

Attach the ears just outside the pretzel antlers.  With the black decorating gel, add a little eyeball in the center of each white M&M.  Admire the cuteness! 

Beware, these are somewhat fragile with the pretzel antlers in place, so if you're traveling with them, you may want to think of adding the antlers after you're there (or using mini candy canes or much smaller pretzels). 

Enjoy!

Don't miss a single recipe at Recipe Shoebox.  Sign up on the right for free email updates.

Read more...

Peppermint Swirl Cupcakes

Saturday, December 3, 2011

Day 3 in Recipe Shoebox's Holiday Baking series brings us these yummy looking cupcakes from Jen!  Come back each day in December for a new holiday goodie recipe!  

When I think of Christmas treats I immediately think of Edy's (Or Dryer's, depending on what side of the country you live on) Peppermint Ice cream. It only comes out this time of year and every season we stock up on the stuff. Unfortunately I can't get that here in France, so with my imported peppermint extract I'll have to come up with other minty treats of my own. OK, actually I didn't come up with this, I got it from yet another grocery check out line magazine. This recipe comes from Pillsbury best holiday desserts and it's probably still in your grocery store right now. They are easy and yummy. In fact, one of my boys gave me a big hug and told me how yummy they were. (And he even ate the whole thing, not just the frosting!)
Click here for printable recipe.

Posted by Jen.

The Ingredients:


1 box white cake mix
water, oil, and eggs called for on the box
1 tsp peppermint extract (I may have used a little more like 1/4 tsp more)
red food coloring
white frosting
red sprinkles or crushed peppermint candies (I didn't have any)

The Directions:
Preheat oven to 350 degrees and place muffin liners in muffin tin.

Prepare cake batter as directed on box and mix in peppermint extract.
Divide the batter in half and in a separate bowl add red food coloring and mix well.

Spoon a couple Tbsp of red batter into muffin tin, and then top with white batter.
With a sharp knife, swirl the red and white together. (I'm not a very good swirler)
Bake 18-20 minutes or until toothpick comes out clean in center of cupcake. Cool and frost. Sprinkle with sprinkles or chopped peppermint candies. If desired you could use spearmint flavoring and green food coloring to do the same thing. I think I need to work on my frosting piping skills. Hmmmm.

Don't miss a single recipe at Recipe Shoebox.  Sign up on the right for free email updates. 

Read more...

Cooking with Kids: Ladybug Cupcakes

Wednesday, April 27, 2011

Recently my little girl turned six and was excited to bring in a fun birthday treat to share with her classmates at school.  Since her birthday fell on one of my craziest days of the week, in addition to making them cute and fun, I also needed them to be simple and easy to make.   That's when I thought of these cute little cupcake fellows I had seen at a friend's house! The process of decorating them, except the antennae, was simple enough to be a kids' job.     The antennae were definitely an adult job, and a little challenging even for me  at first, but once I got the system figured out (using a straight sewing pin) it went pretty fast.  These would be a perfect treat for a springtime birthday party or for a preschool bug theme.  Enjoy!   

While you're here, be sure to check out my other fun cooking with kids ideas. 


Click here for printable recipe. 


The ingredients:

Baked cupcakes
Red (or pink) frosting
Brown m&m's (five per cupcake)
Brown shoestring "pull n peel" licorice (I could only find red)
Gumdrops

Directions:
Frost the cupcakes with red or dark pink frosting. 

Place 5 brown m&m's over the cupcake (leaving room for the gumdrop head).


Peel licorice into single strands and cut into approximately 1-inch pieces. 
Using the point of a sharp knife (or a sterilized sewing pin), poke two small holes in the top of the gumdrop for the antennae. 

Again, using the point of the knife or pin poke the antennae into the holes, taking care not to break the licorice.  (it took me a few tries to get it right, but after I got the hang of it, it was much easier).
Place the gumdrop and antennae onto the cupcake. 

Smile and enjoy!!!


************************
Don't miss a single recipe, sign up on the right to be an email subscriber! 

Read more...

About This Blog

My name is Lara and while I'm definitely not a gourmet cook, I do love preparing tasty, healthy meals for my family. Finding new recipes to try and sharing the ones we've already fallen in love with is a passion I've had since college and the reason why I've started this blog! With five kids, I'm usually in a hurry, so you'll find most of these recipes kid friendly and simple to make.

  © Blogger template On The Road by Ourblogtemplates.com 2009

Back to TOP