Creamy Avocado and White Bean Wrap

Monday, April 9, 2012

Looking for something light and different for lunch or dinner after all that Easter candy?  This wholesome vegetarian wrap is just the ticket.  It was surprisingly hearty and good enough tasting for the adults to enjoy and the kids to eat without complaining.  This one's definitely going into our weekly meatless meal rotation.   
(PS  I'm not cooking new things yet... just posting things I'd made before my son was hospitalized.)


Recipe Source: Britt's Apron
Click here for printable recipe. 

Posted by Lara.

The Ingredients:


2 Tbs. cider vinegar
1 Tbs. extra virgin olive oil
2 tsp. finely chopped canned chipotle peppers in adobo sauce, seeded*
1/4 tsp. salt
2 cups shredded red cabbage
1 medium carrot, shredded
1/4 cup chopped fresh cilantro
1 can (15-oz) white beans, rinsed  (I used garbanzo beans)
1 ripe avocado
1/2 cup shredded sharp Cheddar cheese
2 Tbs. minced red onion
4 8- to 10-inch whole-wheat tortillas

Directions:
In a medium bowl, whisk together vinegar, oil, chipotle pepper (take out the seeds first), and salt. Add cabbage, carrot and cilantro; toss to combine.

In a separate medium bowl, mash together beans and avocado with a potato masher or fork. Stir in cheese and onion.

To assemble the wraps, spread about 1/2 cup of the bean-avocado mixture onto a wrap (or tortilla) and top with about 2/3 cup of the cabbage-carrot slaw. Roll up. Repeat with remaining ingredients. Cut the wraps in half to serve, if desired.

OOPS!  The recipe says to leave the two mixtures separate, but I accidentally combined them.  It still turned out great and didn't affect the taste at all, so feel free to do it either way!

*Ingredient Note: Chipotle chiles in adobo sauce are smoked peppers packed in a flavorful adobo sauce. Look for the small cans with the hispanic foods in large supermarkets. Once opened, they’ll keep at least 2 weeks in the refrigerator or 6 months in the freezer. 

I highly recommend deseeding the peppers before adding them. 


Enjoy! 
Don't forget to LIKE Recipe Shoebox on Facebook and sign up on the right to receive future recipes by email!

Read more...

Fruit baskets

Friday, April 6, 2012

When I was younger, I remember watching my dad make cute baskets out of oranges. I was always impressed that my dad could make these. (because he wasn't usually very present in a kitchen). But, when it came to getting ready for a dinner party, my dad would get out his knife and cut away. He's also pretty handy with a saw, so perhaps it came naturally for him to carve out fruit. You can also do this with watermelon, cantaloupe, or any round type fruit. (although the orange peel is easier to cut through). I decided to try my hand at these for our Easter dinner. You could even add some green coconut on top to look like grass or grapes for the "eggs". I may consider wrapping a licorice "bow on the handle just to make it more enticing for my kids.


Click here for printable recipe.

Posted by Jen.

The Ingredients:

Oranges (as many as people are going to be eating)
Strawberries (I used 8 strawberries for 4 baskets)
Pears (1 pear made 4 baskets)
Grapes (red or green)
other fruit you may like (ie, Kiwi, bananas, apples, pineapple, etc)

Directions:
Wash your fruit.

Use a small sharp knife and first cut down from the top , but only about a third of the way down. Don't cut right in the middle, but about 1/8 inch from the center. Now move 1/8 inch to other side of the center and cut straight down about one third of the way down. This will be your handle and it should be about 1/4 inch thick. (I'll get a better picture soon and put it up)

Next either cut a straight line across the middle of a zigzag. Do not cut all the way around. Make sure you stop where you cut the handle.
It should look like this: (but make your handle a bit skinnier than this one)Now proceed to cut around in the middle to get out the orange. You may need a spoon or a melon baller to help you get it all out. This will be juicy and potentially messy. Pour the juice into a bowl that you are going to mix your fruit salad in.


Cut up the orange pulp into pieces (without much rind). Cut up the rest of the fruit into smaller pieces. Add it all to the orange juice and mix. (the orange juice will help the pears to not brown)
Now scoop your fruit salad into your basket. You may want to arrange it so that a couple grapes are on top to resemble Easter eggs.

I added some green coconut to this to look like grass, but I'm thinking it's a bit too much. What do you think?

Do
n't miss a single recipe on Recipe Shoebox--sign up on the right for free email updates.

Also, don't forget to "LIKE"
Recipe Shoebox's new Facebook page!


Read more...

Easter Cinnabunnies

Monday, April 2, 2012

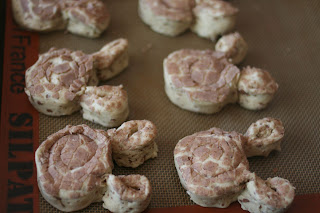
With my son in the hospital for nearly three months now, I've been away from my kitchen for far too long.  Today was the first day of Spring Break for my kids, so while my husband was taking a turn at the hospital with our son, I decided it was high time to cook up some kitchen fun with the rest of the kids!   We found these cute little "Cinnabunnies" on Pinterest and couldn't wait to give them a try.  They were easy peasy and although our bunny ears ended up looking a little more mouse-like than bunny-like, these little cuties were still great fun to make and yummy too!  Next time we'll just make them with longer, floppier ears. 

Be sure to check out our other fun Easter kids' projects:   Edible Bird's Nests and Easter Bunny Buns!


PS  My son in in his third round of chemo and so far is responding well to treatment. 

 Recipe Source:  Betty Crocker . com

                                               Click here for printable recipe. 

Posted by Lara.


The ingredients (1 batch makes about 4  bunny rolls):


1 roll (12.4-oz) refrigerated cinnamon rolls with icing (8-pack)
Raisins/craisins (for eyes and noses)
Sliced almonds (for teeth)
Pastel sprinkles, optional

Directions: 

Place 4 cinnamon rolls onto greased cookie sheet.  
(Obviously we were making a double batch in the picture). 


Unroll the remaining four cinnamon rolls (we had to use a knife to cut along the lines to get them to unroll). 


Cut each unrolled cinnamon roll in half and form into bunny ears (next time I'll make the ears longer and more flopped to the side than we did in these pictures).  Place 2 dough ears onto each cinnamon roll, pinching the ear and the face together slightly to keep in place. 


Using 3 raisins/craisins place eyes and a nose onto each bunny face.  Finally add 2 sliced almonds for teeth. 
Bake in the oven as directed on package.   (my package said 400 degrees for 13-14 minutes). 


While still warm,  ice the ears with the enclosed icing container, then sprinkle with pastel colored sprinkles if desired.  

Makes 4 bunny rolls. 


Enjoy! 


Don't miss a single recipe on Recipe Shoebox.  Sign up on the right for free email updates. 

Also, don't forget to "LIKE" Recipe Shoebox's new Facebook page

Read more...

April Fool's Day Mashed Potatoes and Meatloaf

Wednesday, March 28, 2012

April Fool's Day is coming up soon and I'm getting prepared to trick my kids! (Ha, ha, ha...evil laugh) I recently purchased a great book called "Fake out Food" which is an AWESOME book for food ideas to trick your kids. My boys don't like meatloaf, but I'll bet that they'll love this 'meatloaf' with marshmallows, chocolate, and fruit snacks. I love how it looks so real. Have fun coming up with different ways to present your food. You'll be surprised if you start looking at food and thinking of other ways to make it look like something else. In fact just the other day I thought to myself "I think that scallops look like apple chunks. Hmmmmm" What are you making for your April Fool's Day trick?

Posted by: Jen

Ingredients:


3 Tbsp butter
6-8 c cocoa rice krispy cereal
2 Tbsp cocoa powder
1 10 oz pkg mini marshmallows
1/3 c Craisins
2-3 pkg fruit snacks
other dried fruit, optional
frosting and red food coloring

The Instructions:

Melt the butter in a large nonstick pan. When butter is melted, stir in the cocoa powder until it is smooth.
Add the marshmallows, and stir occasionally to melt all the way through.
While your marshmallows are melting, put the cereal in a gallon baggie and pound with a meat mallet or roll with a rolling pin to crush the cereal. Don't worry if it's not all crushed. It adds to the texture of the 'meatloaf'.
Chop your Craisins, fruit snacks, and any other dried fruit into small pieces. Attention, this can be sticky on your knife. I wonder if it would help to spray your knife with nonstick spray first. Add the fruit snacks to the baggie of crushed cereal and mix it all in well.
Add the cereal mixture to the melted marshmallows and stir in until all the cereal is completely coated with marshmallow.

Grease a loaf pan. (or even also line it with parchment paper and spray that.) Pour your marshmallow/cereal mixture into the loaf pan and press down to make it all firm. (spray your hands with nonstick spray before doing this.) Let cool for about 1/2 hour.
If desired, coloring your frosting red and spread a thin layer on top of the 'meatloaf'. (I should have used a deeper red food coloring. Oh well, Next time)

Now for the mashed potatoes. All you need are:

Ingredients:
Vanilla ice cream
caramel sauce
yellow soft candies (ie, Starburst)

You'll want to prepare the 'mashed potatoes' immediately before serving your family. It will take you a grand total of maybe 3 minutes to prepare. Scoop out some ice cream and place it on your serving plate. Gently press in the middle of your ice cream scoop to resemble the cavity for gravy in your mashed potatoes. Drizzle caramel sauce into the cavity and let some drip down the side of the ice cream. Press your yellow candy into a flattened square to resemble a pat of butter. If your candies aren't so soft (like mine were ), then nuke it in the microwave for no more than 10 seconds. I placed my candy on a piece of wax paper (parchment would be better). When it was softer I pressed it down and immediately placed it on top of my 'mashed potatoes'.


Read more...

Pepperoni Pizza Monkey Bread

Tuesday, March 27, 2012

Hi!  My name is Katie and I am a new contributor.  I cook for two little boys that are a little picky and a husband that will try anything.  I love good food and especially anything sweet!  I love to try new recipes and don't like to make the same thing too much.  I got the idea for this from
You can use any pizza crust recipe you like, but personally, this is my favorite!

Click here for printable recipe


Posted by: Katie

Ingredients:


2 Tbsp. butter, melted
1/2 tsp garlic powder
mozzarella cheese, cubed
pepperoni
marinara sauce, for dipping

Pizza Crust-
1 cup warm water
3/4 Tbsp. sugar (divided)
1 Tbsp. yeast
1/2 Tbsp. oil
1/4 Tbsp. salt
2 1/2 cups flour (approximately)

Directions:

To begin, prepare the pizza dough:  In a bowl, mix warm water, 1/4 Tbsp. sugar and yeast.  

Let proof (sit) for about 5 minutes, or until frothy.


Mix in remaining sugar, oil, salt, and flour.  Mix with spoon until too rough and then mix with hands until well combined. Form into a ball.


Cover with a damp cloth and let sit for about 30 minutes, or until doubled in size.  


While dough is rising, melt butter and add garlic powder.  Stir until combine and use a pastry brush to coat a bundt pan.  When the dough is done rising, take little golf sized balls and flatten.  Place a slice of pepperoni and a cheese cube in the middle and pinch closed and into a ball.  


Continue until all of dough is used.


Place each in pan, spreading evenly.  Brush top with remaining garlic butter, cover pan with damp cloth and let rise another 30 minutes.


While rising, preheat oven to 400 degrees.  When done rising, remove cloth and bake for about 35 minutes, or until top is very brown.


Remove from oven and let sit for 10 minutes.  Turn into serving plate and serve with warmed marinara sauce.


ENJOY!


If you want to receive future recipes via email, sign up on the right to be an email subscriber! 

***********************

Want to see links to your favorite recipes from Recipe Shoebox in your Facebook feed?  Be sure to "LIKE" our Facebook page!   


Read more...

About This Blog

My name is Lara and while I'm definitely not a gourmet cook, I do love preparing tasty, healthy meals for my family. Finding new recipes to try and sharing the ones we've already fallen in love with is a passion I've had since college and the reason why I've started this blog! With five kids, I'm usually in a hurry, so you'll find most of these recipes kid friendly and simple to make.

  © Blogger template On The Road by Ourblogtemplates.com 2009

Back to TOP