Showing posts with label lunch. Show all posts

Healthier Lunchbox Ideas

Thursday, September 20, 2012

After dealing with my son's major health issues this past year, I have been adamantly searching for ways  to give him (and my other kids) every chance possible for them to stay as healthy as possible.  Part of that meant making more food from scratch, avoiding food dyes and preservatives whenever possible, and making sure that we always ate whole grain bread products.  Although we'd already been doing a lot of that in previous years, this year I wanted to step it up a notch and also wanted to ensure that their lunches contained a lot more variety than in year's past.    I knew that it was going to take more effort and planning on my part, but it was something that I knew I needed to do for my own peace of mind. 

My major resource in this effort was 100 Days of Real Food, which not only provided me with the encouragement to make the changes, but also provided many of the ideas, which is where I always struggle.  I found that for items that I could not make from scratch or simply don't have the time to make from scratch that I could almost always find healthier options, especially at stores like Trader Joes (my favorite) and Whole Foods.

I used these divided Ziploc containers which fit perfectly into their Land's End lunchboxes, but can also be squeezed tightly into a normal brown paper lunchbag.  We also decided not to use plastic utensils anymore, so we got this inexpensive silverware set for their lunches. It's nice enough to use over and over, but cheap enough that if they lose a piece that it's not the end of the world.   

Stay tuned for more ideas on how to make simple changes to improve your family's diet! 

Here's a glimpse at some of our lunches this year: 
Homemade pizza lunchable.  Whole grain mini pizza crust was below the baggies of cheese and pepperoni.  Sauce was packaged in a small container on the side.  Also included was apple slices and homemade fruit leather. 
 Hummus, cheese, and lettuce tucked inside whole wheat pita bread, along with a hard-boiled egg, orange slices, and light kettle corn.


 Leftover homemade Thai chicken pasta, homemade fruit roll-up, cupcake from the freezer, grapes. I included an ice pack with their lunch this day. 


 Turkey lunchmeat (organic and without any nitrates), cream cheese, and lettuce rolled into a whole wheat tortilla, bag of fresh strawberries, whole grain muffin from the freezer, and sunflower seeds mixed with brown rice krispies.


 Makeover chicken crescents (pulled straight out of the freezer), homemade fruit leather, baked potato chips, grapes and kiwi. 


 Whole grain crackers, baggies of sliced Swiss cheese and organic turkey lunchmeat, orange slices, and homemade fruit leather. 


 Whole grain cheddar cheese pancakes with cream cheese and peach preserves, baked potato chips, carrot sticks, and sunflower butter* for dipping. 


Hummus, cheese, and lettuce pita sandwich with a bag of grapes, celery sticks with sunflower butter* and dried craisins (ants on a log), and whole grain cookie. 


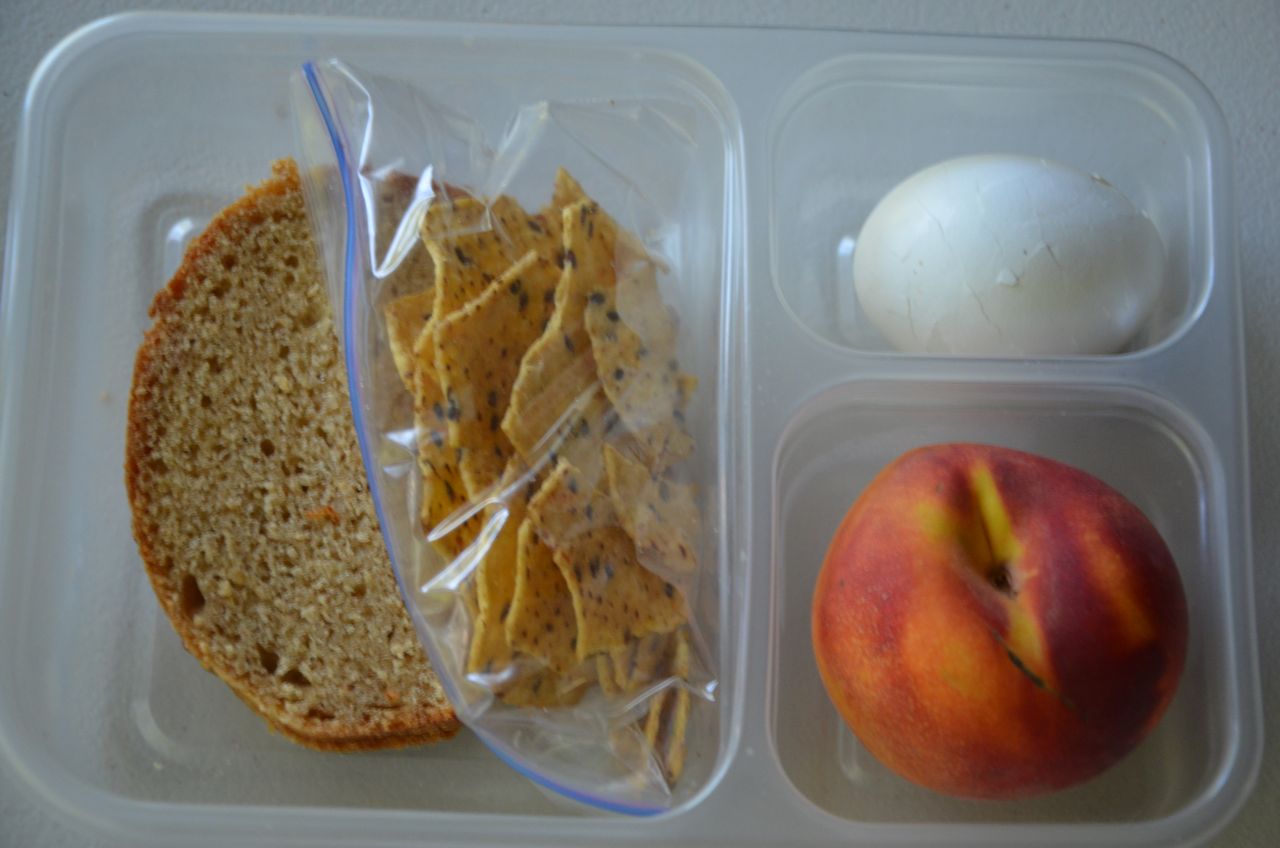
 Sunflower butter and jelly sandwich on homemade whole wheat bread, baked tortilla chips, a fresh peach, and a hard boiled egg. 


Whole grain corndog muffins (halved hotdogs cooked in your favorite cornbread recipe), carrot/celery sticks, hummus for dipping, and yogurt without artificial flavors or colors (from Trader Joes). 

Refried beans, cheese, and lettuce wrapped in a whole wheat tortilla, ranch dressing for dipping, fresh raspberries and grapes,  and baked chips. 

NEW LUNCHES ADDED 11/7/12

Chicken pasta salad, popcorn, strawberries, and sugarfree applesauce

Graham crackers and peanut butter sandwiches, homemade fruit leather roll-up, hard-boiled egg, apple slices (dipped in orange juice to keep from browning).

Homemade oatmeal dinner rolls and cheese, grapes, pretzel bites, and homemade fruit leather.


*Just a note:  My kids do not have any food allergies, but because one of my kids likes to sit at the peanut-free lunch table with a friend, we have been using sunflower butter in place of peanut butter this year.  We serve nuts and peanut butter to them at home. 

Another note: 
My kids range in age from 7-17 and the amount you see here is meant for my older elementary school aged kids (4th and 6th grades).  My younger daughter gets slightly less and my high school aged kids get a little more. 


*****************

Read more...

How to Make Homemade Fruit Leather Roll-Ups without a Dehydrator

Thursday, September 13, 2012

I always thought that making my own fruit leather sounded hard, especially since I don't own a dehydrator.  But in my recent quest to try to cut down on some of the junk in our diet, I learned that it is actually a lot easier than you might think! 

You start off with about 5 cups of fruit, a little squeeze of lemon, and a little swirl of honey...

You throw them together in a saucepan and cook until the fruit is softened...

Throw it in the blender....


blend until smooth...

Then you'll either grease a parchment paper lined cookie sheet (or you can use a Silpat Non-Stick Baking Mat)...

Pour on about 2 cups of the puree and spread until it is about 1/4-inch thick...

Bake in an oven on its lowest setting...

and three or so hours later....you peel off the beautiful supple sheet of fruit leather...

Lay it on some wax paper or plastic wrap...

Roll it all up...


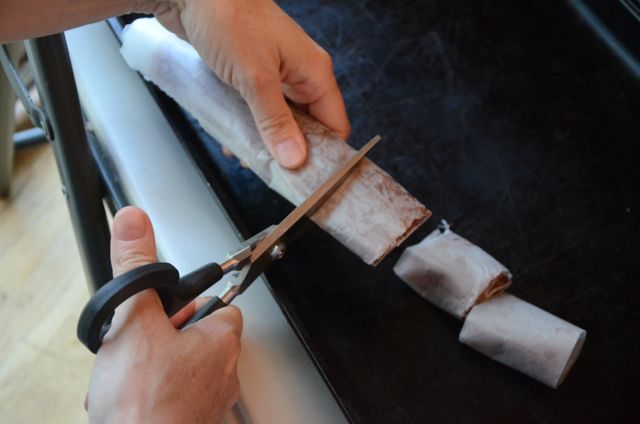
Then cut it into perfectly sized roll-ups for your kids' lunches...

Naturally bright and flavorful, your kids will never miss the red dye #40, buckets of sugar,  and artificial flavorings! 
Click here for printable recipe. 

Posted by Lara.

The ingredients: 
5 cups red seedless grapes  (or other fruit)
2 Tbs. lemon juice
1 Tbs. honey (helps it to stay soft)

Directions: 

Makes about 16 two-inch wide fruit leather roll-ups.

Combine all ingredients in a large saucepan and cook over medium-high heat for 5-7 minutes, or until mixture is juicy and most of the grape skins have fallen off.   Remove from heat and allow mixture to cool for about 10 minutes.  In a blender, blend until mixture is smooth.  Pour 2 cups of the pureed mixture over a greased parchment paper lined cookie sheet (you'll grease the actual parchment paper) or you can use a Silpat if you have that (no need to grease the Silpat).    You should have enough puree to make 2 batches.  Refrigerate or freeze the unused  puree until ready to bake. 

Heat oven to its lowest setting (about 150 degrees) and place the baking pan into the oven.  Depending on how hot your oven is and how big your cookie sheet is, it will take 3-5 hours.  I set the timer for 3 hours, then check it every 20-30 minutes after that.  It will be done when there are no more sticky spots on the surface.  Take care not to overbake it or it will be crispy and lose its flavor. 

When the fruit leather is ready, remove from oven and allow to cool completely.  Gently peel away parchment paper/ Silpat and invert the leather in its entirety onto a sheet of wax paper.   Using cooking shears or a pizza cutter, cut the leather into 2-inch wide strips (about 8).  Roll and store at room temperature in an airtight container for about 2 weeks. 

Other flavors to try:  (the formula 5 cups of fruit, lemon juice and honey works well! Use your creativity)
Mango-Apricot (pictured above):  4 cups chopped mango (fresh or frozen), 1 cup dried apricots, 2 Tbs. lemon juice, 1 Tbs. honey.  Follow directions as listed above.
Raspberry-Peach:  2-1/2 cups sliced peaches (drained), 2 cups raspberries (fresh or frozen), 2 Tbs. lemon juice, 1 Tbs. honey.   Follow directions as listed above.
Blueberry:  5 cups blueberries (fresh or frozen), 2 Tbs. lemon juice, 1 Tbs. honey.  Follow directions as listed above. 
Next I want to try pumpkin and apple for the fall! 

Enjoy!


Read more...

Homemade Granola Bites

Wednesday, September 12, 2012

 In our family's ongoing efforts to eat fewer processed foods, I've been trying to make more of our food from scratch and this week at Recipe Shoebox is dedicated to spotlighting some from-scratch food for the lunch box!   Although I was initially worried that my kids would be resistant to our new healthier lunches this year, but in fact my kids are not only loving the variety, but also loving that they are more participatory than ever in what they're eating.  I handed this recipe over to my eleven-year-old daughter who whipped up a big double-batch of these for the first week of school.  I loved that these were bite-size, wholesome,  and not too sweet (especially if you reduce the brown sugar like I did).    Enjoy!

 recipe source:  Mommy's Kitchen
Click here for printable recipe. 

Posted by Lara. 

The ingredients:

2- 1/2 cups quick or old fashioned oats
1/2 cup rice krispies or puffed brown rice cereal ( I used brown rice krispies from Whole Foods)
2  Tbs. flax seed
1 Tbs. wheat germ
1/2  cup mini semi-sweet chocolate chips
1/2 cup brown sugar (I reduced this to 1/4 cup)
1/2 teaspoon salt
1/2 cup coconut oil
1/4 cup honey
1/2 tsp. vanilla extract

Directions:
Mix all ingredients together, except chocolate chips. Start with a spoon and then mix by hand until everything is blended well. 


If your mixture seems dry after mixing add a little more coconut oil or honey. Add a little at a time until the mixture starts to come together. Stir in the mini chocolate chips.

Using your hands or the back of a spoon, press the mixture firmly into a mini muffin pan that has been sprayed with non stick baking spray.


Bake at 350 degrees for 12-13 minutes.

Remove from oven and allow to sit in pan for about 30 minutes to 1 hour. Remove from pan with mini off set metal spatula and enjoy. 

Store in airtight container.

Enjoy!

Read more...

Personal Lunchbox Pizza

Tuesday, September 11, 2012

School days are upon us and that means that every evening I am preparing not one, but two school lunches for boys.  (just wait until next year when I'm packing 3 lunches!).  One of my sons is allergic to peanuts, so that means that PB&J is out of the question.  So we're often coming up with different things to eat that the boys will eat.  They love pizza, and often take cold leftover pizza in their lunches whenever it's available.  One night as I was making home made pizza I thought I would make a whole bunch of mini pizzas, freeze them, and then they are ready to pop into a lunch box.  They are perfectly thawed by lunchtime.  I think I may have to start actually putting in more than one pizza because the boys gobble it up.

Also check out Lara's post on how to make Homemade Pizza Lunchables.  
Click here for printable recipe.

(and yes, I did put more stuff in his lunch, I just took the picture beforehand.  Oops)

Posted by Jen.

Ingredients:
pizza dough (home made or store bought)
pizza sauce
cheese
pizza seasoning
toppings of choice

I'm not including how much, because it depends on how much you make, and what your individual tastes are.

Directions:

Preheat oven to 425 degrees.

Roll out little balls of pizza dough.  You want to make sure that it will fit in your sandwich baggies so don't roll it out too big.  Poke holes all over the rolled out dough with a fork so that your dough doesn't puff up while baking.

 I like to prebake my pizza crust a little, before adding toppings, but that's my choice. I just tend to like a little crispier crust sometimes.  Add toppings of choice.  My boys pretty much just like cheese.  But if I had planned it out better, I would have added pureed carrots or other veggie to the pizza sauce before spreading it on the pizza.  I need to find some way to sneak veggies into their school lunches.
 Bake for about 10 minutes or until edges are lightly brown and underneath is baked through.  (which is why I like to prebake mine for a couple minutes just to give it that head start.)

When they are cooled completely, then place in individual baggies.  Place in lunches, or the freezer for future quick lunches.


*********************

Don't miss a single recipe.  Sign up on the right for free email updates or visit our Facebook page.   

Read more...

Homemade Pizza Lunchable

Monday, September 10, 2012

For as much as I like to cook dinners and desserts, I've always harbored a fend-for-yourself, rather lazy attitude about my kids' lunches.  For years they've been eating sandwiches almost every day.  My idea of getting daring was mixing it up between PB&J's and lunchmeat sandwiches. This year though, I decided it was time to turn over a new leaf and mix things up for real.  It takes more prep on my part, but it is my goal to send them to school each day with a variety of wholesome and fun foods, that they will enjoy eating.   And although I'm just getting started on this venture, this entire week here at Recipe Shoebox will be dedicated to sharing some of our new favorite out-of-the-box lunch box ideas! 

My kids love those storebought pre-made "lunchables".  Too bad they're not very healthy and are far too expensive when you're making lunches for five every day, so they rarely get them.   As soon as I saw the idea for these DIY Pizza Lunchables, I knew it was something I needed to add to our new "real food lunches" as soon as possible.  I made whole-grain pizza crust from scratch, but you could also use the sandwich thins from the bread aisle to make this even easier.   Additionally, the pizza crusts store well in the freezer, so I made a big double batch to save work for next time.  And there will definitely be a next time, because my kids loved these with a capital "L"!  They were just as fun as the storebought version, but without the hefty price tag! 


Adapted from Mommy's Kitchen. 
Click here for printable recipe.


Posted by Lara.

The ingredients:


(per lunchable)
1-2 pre-cooked mini pizza crusts (see recipe below or use sandwich thins from the bread aisle)
2 Tbs. pizza sauce (my favorite brand)
1-2 Tbs. shredded cheese (I used a mix of cheddar and mozzarella)
1 Tbs. mini pepperoni (or chopped pepperoni)

Directions:
I used this divided container for the main part and a small container similar to this for the sauce.  The crust is unwrapped on the bottom of the container with the pepperoni and cheese in baggies on top.  Also included were apple slices and a homemade fruit roll-up . 

Package up the crust(s), sauce, cheese, and pepperoni as desired.  Add in a fruit, drink, a spoon, napkin,  and a "fun" item and you've got yourself a cheap and healthy homemade lunchable!   It looks a little tight with the sauce sitting on top, but their Lands' End lunchboxes still zipped up without problem. 

Enjoy! 


PIZZA CRUST
(Makes 2 thin-crust pizzas or 12 mini pizza crusts)

1-1/2 cups warm water (about 115 degrees F)
1 Tbs. sugar
1 Tbs. oil
1 tsp. salt
1 Tbs. yeast
3-4 cups flour (I use 1 cup white all-purpose flour and the remainder freshly ground white whole wheat flour)

Directions:
Preheat oven and pizza pan to 450-degrees.  Mix warm water, sugar, oil, salt, and yeast. Stir to combine.  Add flour 1 cup at a time until dough pulls away from the bowl.  Cover bowl and allow to rest for 10 minutes.  Divide the dough into 12-equal pieces and roll out on a floured surface.  Remove hot pan from oven and carefully place the dough rounds onto the surface of the pan (greased or sprinkled with corn meal).   Bake for about 8-minutes or until golden brown.  Allow to cool completely on wire rack.  Store in plastic bags in the freezer. 


Enjoy!


*********************

Don't miss a single recipe.  Sign up on the right for free email updates or visit our Facebook page.   

Read more...

Five things to do with Chicken Nuggets

Friday, March 2, 2012

I often eat lunch with a three year old who loves chicken nuggets. Needless to say, I'm sick of chicken nuggets. Plus, there are some nights that are just really busy and it's easy to heat up nuggets for dinner. But what adult wants to eat chicken nuggets for dinner?! So, I've gotten a little bit experimental with chicken nuggets. This is not necessarily a 'how to' post, but rather ideas for you to use when your children beg for chicken nuggets for dinner.

Ingredients:
Cooked Chicken nuggets
imagination

1. Chicken nugget sandwich.
I often eat this for lunch with my toddler because it's easy and I feel a little more full. It's a bit more complete with wheat bread, cheese, and lettuce.2. Chicken nugget quesadilla.
I chopped up the cooked chicken nugget and put it in between two tortillas with cheese and salsa. My kids really liked this.
3. Chicken nugget wrap sandwich.
I have to admit that the inspiration for this came from McDonalds wrap sandwiches. You can wrap whatever you want and use whatever dressing you want to add. Make it like a ranch club with chicken, bacon, cheese, lettuce, and ranch dressing. Make it Buffalo style with buffalo wing hot sauce, lettuce, and blue cheese dressing. Make it whatever you want! Just make sure to wrap it securely at the bottom so nuggets don't fall out.
4. Chicken nugget curry.
I just cooked the nuggets and added them to heated curry sauce. I did add raisins to my curry sauce to give it a little sweetness and a bit of chopped zucchini for nutrition. Serve over rice.
5. Sweet and sour chicken nuggets.
It seems to me that most stir fry recipes involving cooked chicken would also work with chicken nuggets. Check out this recipe for easy sweet and sour sauce. Or this recipe for Orange chicken.


Stay tuned later for even more ideas of ways to use your kid's chicken nuggets!

Read more...

About This Blog

My name is Lara and while I'm definitely not a gourmet cook, I do love preparing tasty, healthy meals for my family. Finding new recipes to try and sharing the ones we've already fallen in love with is a passion I've had since college and the reason why I've started this blog! With five kids, I'm usually in a hurry, so you'll find most of these recipes kid friendly and simple to make.

  © Blogger template On The Road by Ourblogtemplates.com 2009

Back to TOP