Fun Halloween Food Ideas

Monday, October 31, 2011

I've been doing Halloween dinners for my family and friends for the fast few years. Every year I look forward to planning out new ideas and theme meals. Here are a few that I've done in the past couple of years. These are just pictures with a little "how to" but not a ton of detail. If you're anything like me, sometimes you're just looking for an idea to get those creative juices flowing. I hope I can help out even just a little bit with your Halloween holiday season.

Coffin cake
I baked a cake in a loaf pan and then froze it. Then I cut it into a coffin shape and cut off the top part for the lid. I put cherry pie filling in the middle. Then I used leftover cake crumbs for the ground and piped white frosting hands coming up out of the ground. My only complaint was that this was small. The next time I'd make it in a 13x9 pan.

Stake through the heart chicken nuggets.
This is just chicken nuggets with BBQ sauce. I thought it looked kind of gross so it was appropriate for our Halloween dinner.
Batty brownies
I baked brownies in a spring form pan. When cooled I sprinkled powdered sugar on one side to be a moon. I melted chocolate chips and piped it into bat shapes. Before the chocolate set I added red hots as the eyes.
Eyeballs and brains
This is just spaghetti and meatballs. I used red pepper for the tongue. My boys loved this.

Funny face tostadas
We had tostada shells with all the toppings. Use some re-fried beans so that things stick a little better. Everyone got to create their own face.
Spider pizza
I used the pizza dough in a tube and bread sticks in a tube to make this. I made my pizza with our preferred toppings. Then I took some of the bread sticks and criss-crossed them on top to be like a web. Take a spare bread stick and roll into 2 balls with one being larger than the other. This is the spider head and body. Add on some cut in half bread sticks to be the legs. I used olives for the eyes.
Spider guacamole dip
This was actually like a 7-layer dip. I reserved the sour cream in a baggie and piped a spiderweb on it. For spiderweb instructions go here.Frankenstein dip
This is a spinach dip underneath with a Frankenstein guacamole on top. I used sour cream and olives for the eyes, olives for the hair and bolts, and red pepper for mouth. I found a Frankenstein picture on line and printed it out. I traced it onto the cold spinach dip with a toothpick and then filled it in with the guacamole.
I hope you enjoyed these ideas and have as much fun coming up with ideas and making them as I do. Have a great Halloween party! Happy Halloween!


Click here to see a menu of all of our Halloween recipes in one place and be sure to stop by Recipe Shoebox every day this week for more fun Halloweeny recipes!


*****************

Read more...

Jack-o-Lantern Pumpkin Cheesecake

Sunday, October 30, 2011

Whenever I think of Halloween I always think of the glowing Jack-o-Lanterns on people's front porches. I'm always amazed by some of the detail that people can carve into those things. As much as I like looking at them, they are messy to do. So instead I can create a Jack-o-Lantern on my pumpkin cheesecake. I do this every Halloween. It's cute to look at and it tastes great.


Click here for printable recipe. 
Posted by Jen.

The Ingredients:

1 ready made graham cracker crust
2 8 oz packages of cream cheese, softened
1/2 c sugar
1 tsp vanilla
1/2 c canned pumpkin (not the pumpkin pie blend)
2 eggs
1/2 tsp pumpkin pie spice
1/2 c semi sweet chocolate chips, melted

The Directions:
Cream the cream cheese and sugar together in a bowl until smooth and creamy. Add pumpkin and vanilla. Mix until well blended. Then mix in the eggs and pumpkin pie spice until all blended together.
Reserve 1/3 cup pumpkin batter in a separate bowl. Pour the rest of the batter into prepared crust.

Meanwhile melt chocolate chips in small bowl. Add the reserved 1/3 c cream cheese batter to the melted chocolate. Mix well until you can no longer see the orange pumpkin mixture.Place the chocolate pumpkin mixture into a piping bag (or strong baggie). Cut off a small hole so as to be able to control the amount of batter coming out. Pipe on a Jack-o-Lantern face onto your cheesecake. Flatten down your piping so that it cooks flat.Bake in 350 degree oven for 40-45 minutes or until the center is still barely jiggly or right before cracks start to appear. Remove and let cool on cooling rack. Refrigerate once completely cooled.

Halloween Pumpkin Cheesecake variations:

1. You can make this also using the brownie bottom recipe as found in the recipe for Brownie bottom cheesecake. You will make this in a spring form pan. Follow the rest of the cheesecake batter as directed above.2. Or you could use the pumpkin to create an eerie night time effect for your cheesecake. Instead of mixing the pumpkin into ALL the batter, remove about 1/2 c of the white batter in a separate small bowl and mix in the pumpkin and pumpkin pie spice. (make sure that you have already added the eggs and vanilla before separating any batter) Then pour in the white cheesecake batter into the prepared crust. Drop spoonfuls of the pumpkin batter onto the top of the cheesecake batter and take a knife and gently swirl the pumpkin mixture. For the witch flying, I made sure to swirl it in the same direction.
I found a picture of a witch on a broom. I melted the chocolate chips and cut a tiny hole in the piping baggie. I placed my picture under some wax paper and then I traced the outline of the witch picture with chocolate and then filled it in, like coloring. Once the chocolate is dried, you can remove it from the wax paper and place it on your cheesecake. You can pipe any chocolate shape you want. Lots of chocolate bats, or big white chocolate moon, or silhouette of a werewolf howling are all great options to have with a pumpkin background.


Click here to see a menu of all of our Halloween recipes in one place and be sure to stop by Recipe Shoebox every day this week for more fun Halloweeny recipes!


*****************

Read more...

Spooky and Fun Halloween Drinks

Saturday, October 29, 2011

 Here are a couple fun Halloween drinks to serve at your Halloween dinner party. There is an orange Jack-o-Lantern Smoothie or a drink that would look appropriate at Dracula's dinner table. These are both super easy to do. You could let your kids help as well.


Click here for printable recipe. 

Posted by Jen. 


Dracula's drink

Ingredients:
2 Tbsp corn syrup
red food coloring
toothpick
clear drinking glass (with stem is preferable)

The Instructions:
Place corn syrup on small plate and mix in red food coloring to desired shade of red. Tip rim of glass into the corn syrup.
Stand right side up and let rest for 20 minutes. The corn syrup will drip down slowly giving it the dripping "blood" effect.
The corn syrup will get a little more solid so that it's not quite so sticky. This can be messy if you have too much corn syrup dripping down the glass, because then you have no where to put your fingers when drinking! (I know this from experience).

Serve with a grape juice or your favorite Halloween drink.

Jack-o-Lantern Smoothies
:
1 29 oz can peaches, drained
4 cartons of plain or peach/apricot yogurt
1/2 c orange juice
2-3 Tbsp melted dark chocolate
clear cups

OR your favorite orange smoothie recipe

The Directions:

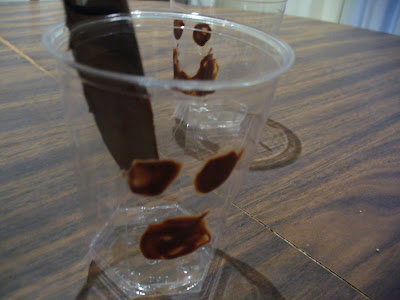
Use the melted chocolate to draw faces on the inside of the cups. Use the back of a knife to do this. (Or if you have a clean small paint brush that would be much easier.) Don't put too much chocolate on the tip of the knife or it may drip into the bottom of your cup.When you're done making your faces, place cups in the fridge so the chocolate will set.

Mix all the remaining ingredients in a blender and blend until smooth.Pour into the cups. If you have green straws it would be like the stem of the pumpkin.


Click here to see a menu of all of our Halloween recipes in one place and be sure to stop by Recipe Shoebox every day this week for more fun Halloweeny recipes!


*****************


Read more...

Mummy Hot Dogs

Friday, October 28, 2011

I know that these cute "mummified" hot dogs are nothing new on the blog scene, but when I had two kids home from school the other day, I decided it would make for a perfect lunch for a couple of sickies!   The process was super simple and from the minute the kids started wrapping their own mummies in dough, they were in love and will likely never want a bunned hot dog again. 
 Click here for printable recipe. 

The ingredients:


1 tube seamless crescent rolls or refrigerated pie crust (or homemade pizza crust)
4 hot dogs
Ketchup, mustard

Directions:
With a pizza cutter, cut crescent rolls (or pie crust) into narrow 1/4-inch wide strips. 

Starting at the bottom of the hot dog (wherever you determine the bottom to be), loosely wrap the wiener with strips of crescent rolls or pie crust, making sure to crisscross the strips in a mummy-like fashion.

At the "head" of the mummy, leave a little space for mustard eyes, but don't add them yet. 

Bake at 400 degrees for 10-12 minutes or until golden brown. 

Dot on the mustard eyes and serve warm with ketchup. 


Enjoy! 


Click here to see a menu of all of our Halloween recipes in one place and be sure to stop by Recipe Shoebox every day this week for more fun Halloweeny recipes!


*****************

Read more...

Deviled Egg Eyeballs

Thursday, October 27, 2011

Deviled eggs are such a great appetizer to have at dinner parties anyway, but  when you make them into spooky looking eyeballs,  then you've got a must-have for your Halloween party. They're not too hard to make in the first place, but you could  put your kids to work helping you pop out the yolks or stirring in the food coloring to make it even easier.  

By the way... Unlike the deviled eggs in this clip from 
the movie "Toys" with Robin Williams, these eggs only look spooky.    :)
Click here for printable recipe. 

Posted by Jen. 


The Ingredients:

6 hard boiled eggs
1/4 c mayonnaise
1-2 tsp yellow mustard
salt/ pepper to taste
black olives
red and blue food coloring
toothpick
piping bag

The Directions:
Slice your hard boiled eggs in half lengthwise. Scoop (or pop) out the yellow yolk into a small bowl.
Mash up the yolks with a fork and then add mayonnaise and mustard. Blend well to make as smooth as possible. Add salt and pepper according to your tastes. You may also want to add more mayonnaise or mustard depending on your taste. Add a couple drops of blue food coloring and mix well.
Spoon your yolk mixture into a piping bag and cut off a hole at the end. (it should be big enough for the thick mixture to come out, but small enough so you can control the amount coming out. Trust me, it's much easier to pipe the yolk mixture into the eggs than it is to scoop it with a spoon! And if you try to use a ziploc baggie, this mixture is so thick that the baggie may burst while piping. Um, so I have had it burst...a few times. Until I learned my lesson and used a piping bag)Pipe the egg yolks into the cavities of the egg whites.
Cut your olives into slices. You can choose to leave them round and have round black eyeballs in the middle, or cut smaller pieces of olive to represent the iris. I think that if you used the round slices it would be awesome to also add in some red pimento or red bell pepper to have red eyeballs. Place your olives in the middle of the yolk.
Squeeze a little red food coloring onto a plate or even a spoon to use. Take the tip of your toothpick and dip it in the food coloring. Now draw red squiggle lines to make it look like the eyes are blood shot.
Or if you just want to make regular deviled eggs, don't add the food coloring or olives. They're still just as tasty.


Click here to see a menu of all of our Halloween recipes in one place and be sure to stop by Recipe Shoebox every day this week for more fun Halloweeny recipes! 

Read more...

Finger Dip

Wednesday, October 26, 2011

It's often hard to get kids to eat their vegetables. However, when you make a Finger dip you may gross them out so much they'll actually want to eat their veggies. (at least if they're boys) What was once innocent carrots and radishes, are now buried fingers trying to dig their way out of the dip. This is very easy to do and fun to serve at any Halloween meal.


Click here to see a menu of all of our Halloween recipes in one place and be sure to stop by Recipe Shoebox every day this week for more fun Halloweeny recipes! 

Click here for printable recipe. 

Posted by Jen. 

The Ingredients:
Your favorite thick vegetable dip (it needs to be thick enough to hold up the 'fingers')
baby carrots
radishes
vegetables to serve with dip like more carrots, cucumbers, celery, peppers, radishes, olives, etc

The Directions:

Wash your vegetables if needed.

Slice ovals off the side of the radishes. Make sure that the white interior is flat so as to be able to lay it flat. Point off one edge so as to look like a jagged finger nail. Make sure to pay attention to size. Your thumb nail is bigger than your pinkie nail!Next choose 5 carrots. Slice off the tip of the baby carrot at an angle so you make a flat area .Get a little dip on the carrot or the back of the radish to use as 'glue'. (actually this picture shows too much 'glue'. You don't want the dip oozing behind the radish.)Apply 'nails' (radishes) to 'fingers' (carrots) and then arrange in your dip so as to look like a hand coming up. Remember to space them appropriately because your thumb is further away from your index finger.

You need to have a good thick dip so the fingers don't slide down in it. The dip would be best if made with a cream cheese and made the day before. My favorite is a basic ranch dip with cream cheese and a little sour cream (and either ranch dressing or ranch mix). Even a good green guacamole dip or hummus would look great with fingers coming up out of it.  Oh, and with a baked pita sticking up behind it with "R.I.P" on it like a grave stone! (I think I'll have to try that next year. I just now thought of that. If you try it, send us a picture!)


Don't miss a single recipe at Recipe Shoebox.  Sign up on the right for free email updates. 

Read more...

About This Blog

My name is Lara and while I'm definitely not a gourmet cook, I do love preparing tasty, healthy meals for my family. Finding new recipes to try and sharing the ones we've already fallen in love with is a passion I've had since college and the reason why I've started this blog! With five kids, I'm usually in a hurry, so you'll find most of these recipes kid friendly and simple to make.

  © Blogger template On The Road by Ourblogtemplates.com 2009

Back to TOP