Caramel-Coconut Cheesecake Bars

Tuesday, July 24, 2012

Today's cheesecake was inspired by that wonderful Girl Scout cookie..the Samoa.  I love the taste of the chocolate with the creamy caramel and the toasted coconut on top.  I hate that they are only around once a year, so doggone it I have to come up with other ways to fill my cravings.  While this cheesecake isn't crunchy like a cookie, it is much nicer to serve for dessert when you have company.  I think the only drawback is that they aren't finger friendly like a cookie.  But just as tasty. 
Click here to see all of our cheesecake recipes in one place! 

 
Click here for printable recipe. 

Posted by Jen.

The Ingredients:
 2 c graham cracker crumbs
1/4 c butter, melted
3 8 oz pkg cream cheese, softened
3/4 c sugar
3 Tbsp corn starch
3 eggs
1 tsp vanilla
1/4 c heavy cream
1/2 c melted  chocolate chips
caramel topping
shredded coconut (I forgot to measure.  Maybe 1/2 a large bag, or the entire 7 oz bag)
1/4 c more melted chocolate chips

Directions:
Preheat oven to 325 degrees.

Line a 13 x 9 pan with parchment paper and let the paper have handle-like flaps over the edge.   (for easy removal.  See 2nd picture)  Lightly spray the bottom and the sides with nonstick spray.  

Place the graham cracker crumbs in a bowl.  Pour in the melted butter and stir with a fork just until the crumbs are moistened.
 Pour crumb mixture into a 13 x 9 pan and press well so the crumbs are all stuck together and even on the bottom.  Notice the parchment paper flaps hanging over the edge?!  Bake in an 325 degree oven for 10 minutes.  When done then let it cool a bit while you prepare your cheesecake batter.  Increase oven temperature to 350 degrees.
 Meanwhile, prepare the cheesecake batter.  Beat the cream cheese and the corn starch and 1/2 the sugar until it's smooth.  No lumps.  If there are a lot of lumps of cream cheese it means it wasn't softened entirely and may contribute to a cracking cheesecake.  (not that it will matter with this particular cheesecake anyway, but just so you know).  When it is all smooth, beat in the remaining sugar.  Then add the vanilla and the eggs one at a time.  Beat until smooth.
 After it is all smooth, remove 1 cup of batter to another bowl.  Melt 1/2 c chocolate chips and then stir the melted chocolate into the reserved cheesecake batter.  Then you will have a chocolate cheesecake batter.
 Pour the plain cheesecake batter into the pan, spreading it evenly. Then drop the chocolate batter in blobs all over the surface.  Take a sharp knife and gently pull it through the chocolate blobs thus creating a swirl.  Don't swirl too  much, or you'll end up with a brown cheesecake.

Bake in 350 degree oven for 35-40 minutes or until center is mostly set. Remove and let cool a few hours. When cooled, place in the refrigerator for at least 3 hours.
 Shortly before you want to serve it, toast your coconut.  Turn on your oven to 400 degrees.  Spread the coconut evenly on a baking sheet.  Make sure that you will be available to watch the coconut.  While it may start out slowly, it will burn very quickly if you're not watching.  Don't let anything distract you from doing this.
 After a few minutes you will notice some of the coconut turning a light brown.  Now is the time to watch it like a hawk.  Pull out the pan and toss the coconut around a bit to get it to evenly cook.  Put back in oven and continue to toss the coconut every 30 seconds.
Err on the side of caution and stop when it is mostly all a light golden color.  Otherwise you could have some pieces start to burn rather quickly.  Make sure you test some of it because it's so hard to resist snacking on toasted coconut.
 Spread some caramel sauce evenly on top of your cheesecake.  If you don't want the caramel to be so oozy then put the cheesecake in the freezer for about an hour before doing this.
 Evenly spread the coconut on top of the caramel.
 Now, use those handy parchment paper handles and lift up your cheesecake out of the pan.  Cut them into squares.  Hint:  I like to use a pizza cutter for easy even cuts.
 Right before serving, melt a 1/4 c chocolate chips into a baggie.  (should take about a minute, but stop after 30 seconds and massage the chocolate to get the heat evenly distributed.)  When it is all melted, then use scissors to cut a tiny hole out of one corner of the baggie. Twist the baggie at the top opened area and hold it with one hand while squeezing at the same time.  Make sure that all the chocolate is melted first because that lone chocolate chip that didn't melt all the way will find a way to clog your hole and therefore cause your bag to burst while squeezing it.
 Drizzle your melted chocolate across your cheesecake and serve right away.
 Just so you know, when the chocolate chips cool, they will harden, so this is best served right after you drizzle.  I put mine in the fridge after the chocolate drizzle and it hardened up before I served it and it was a pain to separate the squares with the nice drizzle on each one without breaking the chocolate lines.  In this picture you can see how much easier it is to separate the squares while the chocolate is still melted.



*****************************
Want to see links to your favorite recipes from Recipe Shoebox in your Facebook feed?  Be sure to "LIKE" our Facebook page!   


Read more...

No-Bake Jello Cheesecake

Monday, July 23, 2012

July 30th is National Cheesecake Day, which means that Cheesecake Week has returned to Recipe Shoebox!  Look here for a recap of all of our past cheesecake recipes and stay tuned for a whole week of delicious new cheesecake recipes! 

This particular cheesecake recipe holds a special place in my heart and I was so shocked to realize that I'd never shared it here on the blog before.  You see this the cheesecake that I grew up eating and it wasn't until a few years ago that I realized what a uniquely wonderful cheesecake recipe this really is.  Unlike most cheesecakes which are delicious, but somewhat on the heavy side of things....this one is light and airy and is more similar to a mousse in texture than a normal baked cheesecake.  I love that it can be easily adapted to any flavor/color you could possibly think of.  I've made this into pink, green, and even blue cheesecakes before just by using a different flavor of Jello.  It's one of our oldest, most favorite summertime desserts! Enjoy! 
Click here for printable recipe

Posted by Lara.

*Advance Preparation:  Place the can of evaporated milk in the refrigerator a few hours before making the cheesecake as it must be chilled in order to whip properly.

The ingredients:


1 small pkg. (3-oz.) any flavor Jello (I used lemon)
1 cup boiling water
2 packets graham crackers  (about 16 whole graham crackers)
1/2 cup butter, softened
1 pkg. (8-ounces) cream cheese
1 cup sugar
1 can (12-ounces) evaporated milk, CHILLED
2 Tbs. lemon juice
pie filling or thickened fruit as desired for topping

Directions:  Dissolve package of Jello with 1 cup boiling water and stir together until dissolved.  Set aside. 


Crush 2 packets graham crackers and blend in 1/2 cup butter (I crushed them in the blender).  Press cracker mixture into bottom of 9x13-inch baking dish.

In a separate bowl, cream together cream cheese and sugar.  Set aside. 


In a large bowl, whip evaporated milk which has been thoroughly chilled.  Add lemon juice and whip until stiff. 

Add cooled Jello into cream cheese/sugar mixture.

Fold whipped evaporated milk into cream cheese/Jello mixture. 

Pour over crust. 

Chill several hours or overnight.  Serve plain or with slightly thickened fruit. 


Enjoy! 


Click here to see all of our cheesecake recipes in one place! 

*****************************
Want to see links to your favorite recipes from Recipe Shoebox in your Facebook feed?  Be sure to "LIKE" our Facebook page!   


Read more...

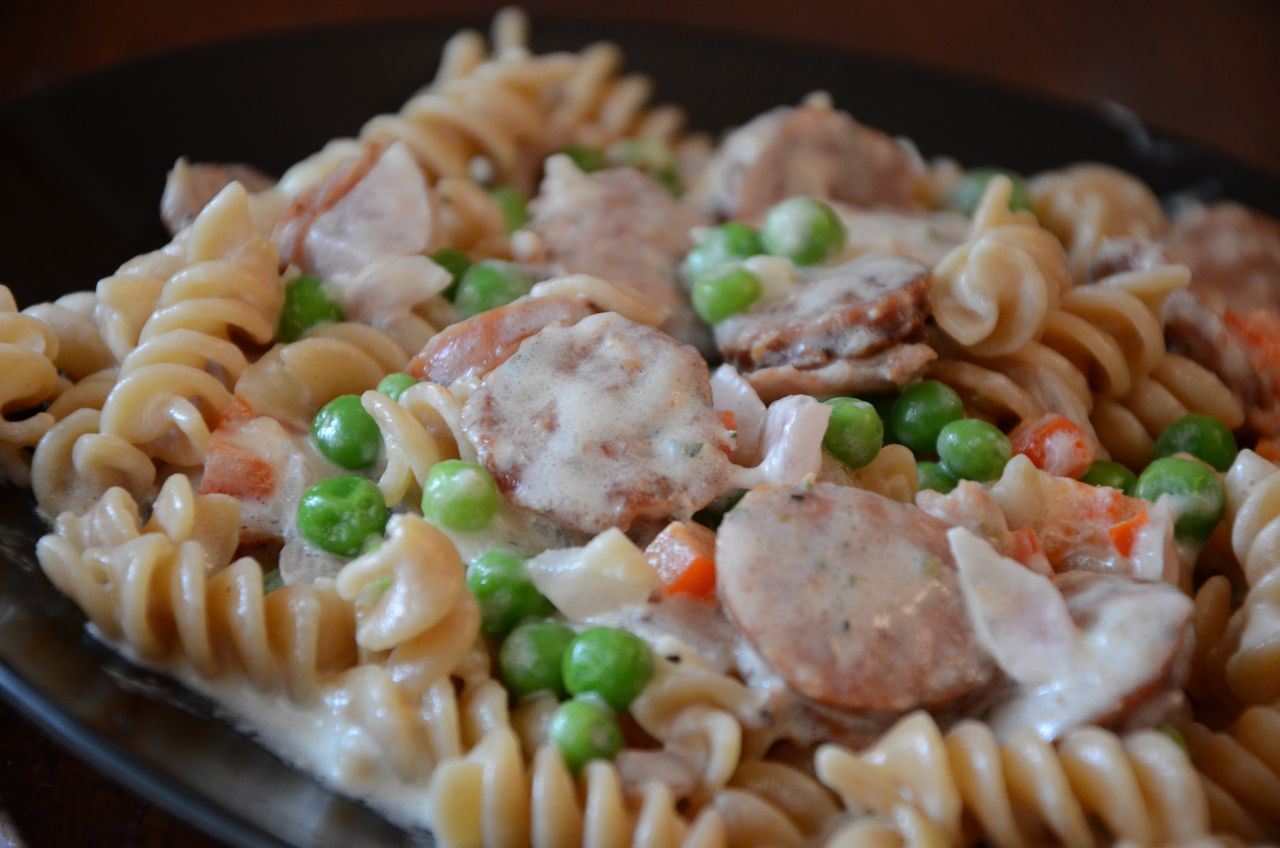
Creamy Pasta with Sausage

Tuesday, July 17, 2012

It's taking time, but I am slowly getting back into the cooking groove again.   I'm perusing my cookbooks again, trying new recipes, and even taking pictures.  Now if I could just get back into the blogging groove too...

This pasta dish was excellent and will definitely be making repeat appearances on our menu!  I made a double batch of this for my family and some visiting relatives and there was not a single bit of it left over afterward.  If you're looking for a fuss-free crowd pleaser, then look no further...


Recipe SourceMrs. Schwartz's Kitchen
Click here for printable recipe.

Posted by Lara.

The ingredients:


1 package (12-ounces) Italian Sausage (I loved this Niman Ranch brand--from Whole Foods)
1 lb penne pasta (or variety of your choice)
1/2 onion, finely chopped
4 cloves garlic, finely chopped
1/2 red pepper, chopped
2 cups cream or half and half
1-1/2 cups freshly grated Parmesan cheese + additional for garnish
1 cup frozen peas

Directions:
Start by taking the casing off of the sausage, cut a long slit in the casing and pull out the meat.  Add this to a large skillet and cook as you would ground beef.  (OR if your sausage is fully cooked like ours was, then you can just slice into "coins" and brown it in the frying pan.)


Remove the sausage from the frying pan and set aside.

Cook the pasta in a large pot of boiling water. 

Add the onion to the frying pan and cook in the sausage grease for about 3 minutes.

  After 3 minutes, add the garlic.  Cook for an additional 2 minutes.  Add the red pepper to the pan and cook for about a minute.


Add the cream to the skillet and bring to a slight bubble on medium heat (but not a full boil). 

Add the cheese once it barely comes to a bubble.  Stir and bring back to a slight bubble and let it thicken.


Add the cooked pasta, sausage and peas to the pan.  Toss to coat in the sauce.

To serve, plate the pasta and top with additional Parmesan cheese and parsley, if desired.  Makes 5-6 servings. 

Enjoy!


*****************************
Want to see links to your favorite recipes from Recipe Shoebox in your Facebook feed?  Be sure to "LIKE" our Facebook page!   


Read more...

Southwestern Pasta Salad

Thursday, July 5, 2012

First a little update on my son:
  It's been a long journey, but my son is now in remission from leukemia and we are verrrrrrry slowly getting back into a routine again. 
Spencer is recovering well and is looking forward to a little normalcy this summer and for his upcoming senior year of high school.  Thank you for all of the prayers and kind wishes in his (and our) behalf.   We have truly felt God's comfort and presence through this entire journey. 


And now onto the recipe: 
While sitting in the hospital with my son over the last nearly 6 months, I would find myself daydreaming about new recipes I wanted to try when life was back to normal.   Unfortunately after only rarely cooking for months on end, I feel out of practice and it's actually been a challenge for me to get back into menu planning/ daily meal making.  Thank goodness for tasty and easy meals like this one to make the adjustment a little easier!    Pasta salad with a Mexican zing may sound a little strange, but it came together well and I loved how the fresh flavors combined.   It also makes for a great make-ahead meal, since the flavor seems to get better and better as it sits in the fridge. 


Adapted slightly from The Bon Appetit Cookbook: Fast Easy Fresh
                        Click here for printable recipe. 

Posted by Lara.

The ingredients:


1 pound box bow tie pasta (farfalle)
1/4 cup olive oil
2 cups diced cooked chicken (a rotisserie chicken or leftover chicken is perfect)
8 green onions, chopped
6 plum tomatoes, chopped
1 can (15-oz.) hominy, drained (found with other canned beans)
1 can (15-oz.) black beans, drained
1 bottle (12-oz.) mild green taco sauce (salsa verde)
1 cup chopped fresh cilantro
1 tsp. salt
1/4 tsp. pepper
1 cup shredded sharp cheddar cheese

Directions: 

In a large pot, cook pasta in boiling water, stirring occasionally.
Drain and rinse pasta and transfer to a large bowl.  Add oil and toss to coat.  Add remaining ingredients, except cheese, gently stir together. 

Add shredded cheese just before serving.


Makes 8 servings.  Serve room temperature or cold.   (it's even better the second day)

Enjoy!


*****************************

Want to see links to your favorite recipes from Recipe Shoebox in your Facebook feed?  Be sure to "LIKE" our Facebook page!   


Read more...

Patriotic Jell-o Cups

Monday, July 2, 2012

With Independence Day coming up soon, I thought it would be fun to find a  fun and easy treat to make for the kids.  The concept of this is simple enough for the kids to do a lot of the work, which made my boys think I was the greatest ever.    In addition to being able to make these a day ahead, these are also super versatile and could be made to fit any holiday   (red and green for Christmas, red, pink and white for Valentines Day, etc. ).
                                                   Click here for printable recipe.

Posted by Jen.

Ingredients:
2 small boxes of red jello (or 1 large box jello)
2 small bozes of blue jello (or 1 box large)
mini marshmallows or Cool Whip


Directions:
Follow the instructions on the box to make jigglers.  Or use 2 C boiling water for every 2 boxes of jello (or large box).  Do NOT add the cold water.  You need to use less water than needed for regular jello in order to make it manageable.  Refrigerate until solid.
 Using a sharp knife (preferable dipped in hot water to make it easier),slice the jello into tiny cubes.

 Use clear cups and add one color of the cubes.  Then add some marshmallows (or Cool Whip)
 Top with the other color of jello cubes.  Optional top with extra cream.

 Lick Jello pan.  Spoons optional.

***********************

Want to see links to your favorite recipes from Recipe Shoebox in your Facebook feed?  Be sure to "LIKE" our Facebook page!   


Read more...

About This Blog

My name is Lara and while I'm definitely not a gourmet cook, I do love preparing tasty, healthy meals for my family. Finding new recipes to try and sharing the ones we've already fallen in love with is a passion I've had since college and the reason why I've started this blog! With five kids, I'm usually in a hurry, so you'll find most of these recipes kid friendly and simple to make.

  © Blogger template On The Road by Ourblogtemplates.com 2009

Back to TOP