Double Lemon Cheesecake

Wednesday, July 27, 2011

Day 3 of Cheesecake Week at Recipe Shoebox brings us Jen's delicious looking double lemon cheesecake.  Be sure to stop in each day this week for a new cheesecake recipe and a linky party later this week in honor of National Cheesecake Day on July 30. 

Tart, sweet, and creamy are three words that I can think of to describe this Lemon Cheesecake. I absolutely love all things lemon and this is another favorite from my trusty
Philadelphia Cream Cheese Collection Cookbook. However, I did stray a little bit and I took the shortbread crust recipe from my Juniors Cheesecake cookbook. (In fact I have to say that the Juniors Cheesecake book is probably one of my top favorite cookbooks. If you like cheesecakes, then go buy this book. You can thank me later.) Anyway, this lemon cheesecake is way better than any lemon cheesecake in any store or restaurant. Pucker up for lemon goodness.

Click here for printable recipe. 


The Ingredients:
For the shortbread crust:
1 c flour
1 Tbsp corn starch
1/4 tsp salt
1/3 c unsalted butter, at room temperature
1/3 c sugar
2 large egg yolks
2 tsp vanilla extract

For the cheesecake:
3 packages (8 oz each) cream cheese, softened
1 c sugar
3 Tbsp corn starch
zest of 1 lemon (just the yellow part)
juice of 1 lemon (no seeds please)
1/2 tsp vanilla
3 eggs

For the lemon curd (or just buy some at the store):
3/4 c sugar
2 Tbsp corn starch
1/2 c water
1/4 c lemon juice
1 egg yolk, beaten

The Directions:
Preheat oven to 350 degrees and butter bottom and sides of spring form pan. (Line the bottom with parchment paper to make it easier to remove to another plate for presentation.) Beat the butter and sugar together until creamy. Mix in eggs yolks and vanilla. Mix in flour, corn starch, and salt until a dough forms. Work the dough together with your hands into a ball and chill for minimum 30 minutes. (It will be easier to handle later).

Lightly flour your hands and place dough in middle of spring form pan and start pressing the dough outward with the palm of your hand in a circular motion around the bottom of pan and up the sides. Prick the crust all over with a fork so as to prevent it from puffing up. OR if you don't want the crust going up the sides, then take about 2/3 the amount of the crust and just press it into the bottom of your pan. (You can eat the rest or bake it in a pie pan with some cinnamon sugar. Just a thought)Bake the crust until it's set and golden about 15 minutes. If it starts to puff up then take it out and press it back down with the back of a spoon. (Or maybe that's just my crust and my lack of crust skills. Hmmm) Remove from oven and let the crust rest in the pan while finishing up the cheesecake batter.

While the crust is baking, blend cream cheese, corn starch, and sugar in a bowl until smooth. Add in lemon zest, lemon juice, and vanilla. Then beat in the eggs one at a time until well mixed and all is smooth.Pour batter into prepared crust and bake in 350 degree oven for 50 minutes to 1 hour. (I wrap mine in foil just to prevents any leakage. I had brownie batter leak out once and it was a mess, so I always wrap my springform pans now)Take it out when the outside is set and the center is a slightly wiggly. If there are brown spots or cracks then it's technically overcooked, but don't worry. It won't affect the taste. In fact, no one will know because you're going to cover it up with a lemon sauce. If you look at mine, then you will see cracks. Even someone who's been making these for more than 10 years gets distracted and gets it out too late.Cool on cooling rack until ready to put in the refrigerator and refrigerate for at least 4 hours or overnight. After the cheesecake has cooled and is resting in the refrigerator, then start to make the lemon curd. (Or to save time, get some at the store!) Mix the sugar and corn starch in a non stick pan. Add the water and lemon juice and stir until dissolved. Turn stove on to a medium high heat and stir bringing it to a low boil. You'll need to keep stirring for about 5-7 minutes until slightly bubbly and thick.
Meanwhile, separate an egg and place the egg yolk in a separate bowl. When the sauce has thickened and starts to be bubbly, then turn down heat. Rapidly stir 2 -3 Tablespoons of the hot mixture into the egg yolks, one Tbsp at a time. Stir quickly so as to prevent the eggs from cooking in the hot liquid. (This is called tempering your eggs). Then when the egg mixture is mixed together add it back into the lemon sauce. Continue cooking for a couple more minutes stirring constantly. Cool it slightly (especially if you have the urge to stick a spoon in and eat some). Spoon the sauce over the cooled cheesecake. Refrigerate until ready to serve. (If you want to freeze this and make it ahead of time, then wait to make the sauce until the day you're going to serve it. Don't freeze with the lemon sauce on top). I promise you're going to love it, especially on a summer day.

Read more...

Easy No-Bake Cheesecake

Tuesday, July 26, 2011

Day 2 of Cheesecake Week at Recipe Shoebox brings us this super easy no-bake cheesecake.  This old classic has been in our family for years and still it brings rave reviews whenever we serve it.  It's especially perfect for these hot summer days of late, since its preparation is completely heat free (if you buy a pre-made crust) and takes a mere 5 minutes of your time.  To make it an even quicker process, we have even been known to stick the finished cheesecake into freezer to help it set up even faster, although speaking from personal experience it still tastes pretty darn good if it's not set up yet.  :) Enjoy! 

Don't forget to come back to the Recipe Shoebox each day this week for a new cheesecake recipe and later this week they'll be a cheesecake link-up party in honor of National Cheesecake Day on July 30.    
Click here for printable recipe. 

The ingredients: (I recommend that you double the filling ingredients if you use a larger pie crust like I did or if you want the pan to be heaping with yummy cheesecake goodness)


1 pkg. (8-ounces) cream cheese, softened
1/2 cup sugar (or small package [3.4-ounces] of instant pudding mix)
1 Tbs. lemon juice (omit if using pudding mix instead of sugar)
1 container (8-ounces) Cool Whip
1 (6-ounce) prepared graham cracker crust 
Desired toppings:  pie filling, additional Cool Whip, cookie or graham cracker crumbs, chocolate syrup for drizzling

Directions:
In a large bowl, cream together cream cheese, sugar (or pudding mix), and lemon juice (if using) until smooth and lump free.    Mix in Cool Whip just until thick, creamy, and combined. 

Pour immediately into prepared graham cracker crust.  Refrigerate at least 4 hours (or if you're in a hurry, stick in the freezer for  1-2 hours) or until set.  Serve cold with desired toppings.  Blueberry pie filling is our favorite topping. 

Makes 6-8 servings.  Enjoy! 

For chocolate variation:  Substitute the sugar with a package (3.4-ounces) of instant chocolate pudding and proceed the same as above.  Top with additional Cool Whip, Oreo cookies,  and crumbs if desired. 

Don't miss a single recipe at Recipe Shoebox--sign up for free email updates on the right.  


Read more...

Brownie Bottom Cheesecake

Monday, July 25, 2011

In honor of National Cheesecake Day coming up on July 30, we here at the Recipe Shoebox, are going to post a new cheesecake recipe every day this week!  Make sure you stop by every day for a new cheesecake recipe and look out for a cheesecake Linky Party later this week where you can come link up your favorite cheesecakes as well!  

From Jen:  Cheesecake is one of my favorite desserts and this recipe is one of my favorite cheesecakes to make. It's versatile, super good, and easy and I always get great compliments when I make this.   How can you go  wrong with brownies and cheesecake combined into one dessert? I first found this recipe in a Philadelphia Cream Cheese Collection cookbook. Although I am one to stray from a recipe, I haven't changed much at all with this one because it's perfect just the way it is. Here's the original recipe from the
Kraft website. But I always change what I put on the top or mix into the cream cheese. My favorite is simply cheesecake with canned cherry pie filling.
Click here for printable recipe.


Posted by Jen

The Ingredients:

1 package brownie mix (plus all the ingredients required on the box)
3 packages (8-ounces each) cream cheese, softened
3 Tbsp corn starch
3/4 c sugar
1 tsp vanilla
3 eggs
1/3 c whipping cream* (or whole milk in this case because I didn't have any cream)

*the Kraft and Philadelphia recipes call for 1/2 c sour cream instead of liquid cream. This works great as well, I just didn't have any on hand

The Directions:

Grease a 9 inch springform pan. (or today I actually used a 9x13 pan). Line bottom of springform pan with parchment paper or line 9x13 pan with parchment paper hanging over the edge so you can remove them easily.

Prepare brownie mix as directed on box. Pour into prepared pan.
Bake according to directions on brownie box for 9 in square pan (if using a springform) or 9x13 pan. When it comes out of the oven, prick it all over so as to create texture for the cream cheese layer to stick better.
While the brownies are cooking, prepare the cream cheese batter. Beat the softened cream cheese with the corn starch and sugar until smooth. Lumps can help contribute to cracks in the end, so make sure it is smooth. Mix in eggs and vanilla. Beat in cream (or sour cream) just until it's all mixed in.
Pour batter over brownie crust and smooth it out.
Bake in 350 degree oven for 55 minutes to 1 hour. (but start peaking at it at about 45 minutes). You know it's done when most of it is set but the center is still slightly wiggly. Cracks and brown spots will mean you over cooked it a little, but that will not affect the taste in the slightest. In fact, if you put chocolate or fruit on top, no one will know except you! (See, I have a few little brown spots in this picture, but it was still great!)
Run a knife or spatula around the edges to loosen the cake. Let cool all the way on a cooling rack and then refrigerate at least 4 hours. You can also put this in the freezer for later but just wrap it up well when cooled. When ready to serve loosen the sides of the springform pan and if you want to move it to a platter for presentation, then carefully remove the bottom parchment paper. If you have used a 9x13 pan then, when you are ready to serve, you can lift it out of the pan and cut into nice squares. Use a pizza cutter. It makes nice clean lines.I have made this cheesecake so many times. Here is the same cake cooked in a springform pan covered with chocolate ganache. Then I topped it with cherry pie filling and piped whipped cream around the edges.
Here is another where I piped the chocolate across the top and placed maraschino cherries around the edges. I actually won a contest at my husband's work with this one!

Read more...

Menu 7/25 - 7/31

We have been right smack dab in the middle of the giant heat wave covering a good portion of the USA and man is it hot around here!  With another big heat wave predicted for later this week, you'll find this week's menu filled with slow cooker, stove top, and grilled recipes! 
Stay tuned later today for the kick-off of Recipe Shoebox's week-long tribute to NATIONAL CHEESECAKE DAY coming up on July 30!     We'll be posting a new cheesecake recipe every day of the week (including a couple of great no-bake ones).   


Monday
--
Slow Cooker Sloppy Joes (new)

Fresh Strawberry and White Chocolate Cookies--We have some fresh strawberries that we need to use and these cream cheese based cookies are one of our favorite ways to use them!


Tuesday--
Thai Chicken Pasta
--my daughter came home from a church camp raving about a Thai dish they'd served there, so I'm making this well-loved dish for her.  :)

Wednesday--
Asian Chicken Peanut Wraps--Healthy and good, my family loves these light and easy wraps.  I"ll definitely grill the chicken to avoid turning on the oven. 


Thursday
--
Creamy Gazpacho (new)

Root Beer Floats on a Stick
--these are as easy as can be to make and actually taste just like root beer floats!  Perfect for the sweltering summer weather we've been having lately!


Friday--
Make-Your-Own Personal Pizza
(super easy)--using sandwich thins as the crust, this is one of my kids' (and my) favorite ways to make pizzas


Saturday--
Pepperoni and Fresh Mozzarella Panini
--fresh off the grill, these are tasty and perfect for a summer meal

Sunday--
Creamy Lemon Pepper Chicken Pasta--one of our new favorite meals.


Braided Bread--an old classic from my cousin Trish, we love this easy homemade bread. 


**********
Go check Organizing Junkie for lots more Menu Plans!


***********
Don't miss a single recipe, sign up for email updates (on the right). 


Read more...

Best Grilled Chicken Fajitas Ever

Friday, July 22, 2011

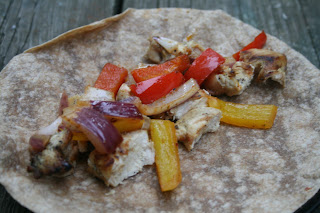
One random Saturday evening I was stressed out when dinner time arrived and frankly hadn't put any thought into what I was going to cook.  That's when my sweet husband swooped in and offered to make dinner, so that I could finish up what I was working on.    I had recently received a food magazine from a local grocery store and when I offered it to him as a resource for choosing a dinner recipe, this is the one he chose.  We love fajitas, but honestly I didn't expect anything spectacular.  Man was I wrong though!  My husband followed the recipe exactly and I was shocked when they ended up being the best fajitas I'd ever had.  The chicken was so tender and the unique BBQ  flavor made it so that even my fajita-phobic son gave them the stamp of approval.    In addition to adding these fajitas to our regular rotation, we now follow this method  for perfectly tender grilled chicken every time. 

Adapted from Wegman's Menu magazine.   (check out all the great reviews on it)

Click here for printable recipe.

The ingredients:

1 onion, thinly sliced to about 1-inch
1 sweet red pepper, thinly sliced to about 1-inch
1  green pepper, thinly sliced to about 1-inch
2 Tbs. barbecue seasoning, divided (I used McCormick Grill Mates Barbecue seasoning)
4 Tbs. olive oil, divided
1-1/2 lbs. boneless, skinless chicken breasts, cut into thirds (lengthwise)
6-8 flour tortillas (8-inch size)
Toppings:  salsa, sour cream, shredded lettuce, shredded cheese or crumbled queso fresco cheese

Directions:  Preheat grill to HIGH for 10 minutes.  Clean grill with wire brush.  Using a soft cloth, coat grill grate lightly with vegetable oil.  Toss peppers and onions with 1 tablespoon BBQ seasoning and 2 tablespoons oil.  Spoon into disposable 9x13-inch foil pan.  cover pan tightly with a large piece of foil, sealing well.  Reduce heat to MEDIUM.  Place pan on grill; close lid. 

Cook 10 minutes, shaking pan occasionally.  Remove from grill and keep warm with grilling chicken.  Return grill heat to HIGH. 


Drizzle chicken with just 1 tablespoon oil.  Sear chicken on grill 2 minutes until it has change color one-quarter of way up from bottom.  Turn over; sear 1-3 minutes.  Turn over chicken.  Cook 1-3 minutes; turn over again.  Reduce heat to MEDIUM: cook 12-15 minutes until internal temps reaches 165 degrees.  Transfer chicken to a clean platter. 

(NOTE:  grilling the tortillas is optional.  We tried it both ways and some of us preferred the tortillas just warmed in the microwave, so that's what the pictures reflect.) Brush remaining 1 tablespoon oil on one side of tortillas; place oiled-side-down on grill.  Brush tops with oil and sprinkle with remaining 1 tablespoon barbecue seasoning.  Turn after 30 seconds when slightly browned.  Grill second side 30 seconds; remove from heat. 

Slice chicken very thinly; portion evenly onto tortillas.  Top with peppers and onions. 


Serve with salsa, shredded lettuce, sour cream, extra BBQ seasoning, shredded cheese, and/or queso fresco cheese.  Makes 8 fajitas. 

Enjoy! 


Don't miss a single recipe at Recipe Shoebox, sign up for free email updates.

Read more...

About This Blog

My name is Lara and while I'm definitely not a gourmet cook, I do love preparing tasty, healthy meals for my family. Finding new recipes to try and sharing the ones we've already fallen in love with is a passion I've had since college and the reason why I've started this blog! With five kids, I'm usually in a hurry, so you'll find most of these recipes kid friendly and simple to make.

  © Blogger template On The Road by Ourblogtemplates.com 2009

Back to TOP