Strawberry Shortcake Cheesecake

Friday, September 30, 2011

What would happen if one were to combine Strawberry Shortcake and cheesecake? You have the vanilla cake bottom, with strawberries in the middle and then a cheesecake layer on top, all smothered with cream cheese frosting, more strawberries and whipped cream! What's not to like with all this strawberry and cheesecake goodness?!Click here for printable recipe.


Submitted by Jen.

The Ingredients:

1 box yellow cake mix (plus all the ingredients listed on box for the cake)
1 small box vanilla instant pudding mix (optional)
2 packages (8-ounces each) cream cheese, softened
1/2 c sugar
2 Tbsp corn starch
1/3 c sour cream
1 tsp vanilla
2 eggs
1 container cream cheese frosting (or recipe that follows*)
fresh strawberries
whipped cream

2 round cake pans the same size ( Note: For this cake you will need to use one pan for the cake and one pan for the cheesecake. Yes you will have extra batter of both the cake and cheesecake to fit, so feel free to make other sizes and use whatever pans you want for the extra batter. I actually made some mini cheesecakes and froze them for later. As far as the cake I make some extra cupcakes)

The Directions:
Make cake mix according to package. Add the pudding mix to the dry ingredients if you want to before you add the wet ingredients. Grease and flour a 8 or 9 inch cake pan. Pour cake batter into pan. Bake cake according to the box directions for a round cake. After 5 minutes out of the oven , remove cake from pan and let cool on a rack. While the cake is cooking, prepare the cheesecake batter.

Grease and line other pan with parchment paper. (cut into a circle the same size as the pan) In a bowl beat the softened cream cheese, sugar, and corn starch until smooth. Beat in the eggs one at a time and then the vanilla. Then mix in the sour cream.

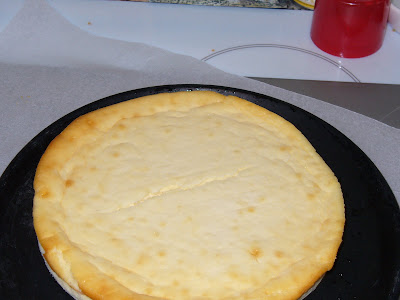
Pour cheesecake batter into the other greased and lined pan about 2/3 full. Bake in a 350 degree oven for about 45 minutes. It is done when the outside is firm, but inside still a little jiggly. If it's starting to get brown on edges, take it out as it is done!You'll notice that I actually over cooked mine because you can see the lovely crack down the middle. But we're covering it up with frosting anyway. Once the cheesecake is done, let cool completely on a rack. When cooled, wrap it with plastic wrap and place in freezer. (only when completely cooled. You can stick it in the fridge for a while if you would like before transferring to freezer). Also once the vanilla cake is cooled, wrap it in plastic wrap and put in freezer. Freeze both until the cake is frozen (or overnight). A frozen cake is easier to cut without leaving behind a bunch of crumbs.
When ready to assemble, wash your strawberries and get out the frosting. Dry and dice some strawberries. Cut away the top of the cake so that it is flat. Frost the top with some frosting and cover with diced strawberries.Place the cheesecake layer on top of the strawberries.
Frost the cake with the cream cheese frosting*. (Or whatever kind of frosting you want. A pink strawberry frosting would taste great too!)Slice and top with strawberries and whipped cream. I would recommend making this for a larger dinner party because the strawberries in the middle could get soggy if left more than a couple days without eating it all. But that may be rather unlikely since I'm sure there will be people asking for seconds.
*My favorite cream cheese frosting recipe: from Juniors Cheesecake Cookbook
NOTE:  I recommend halving this frosting recipe, when making it for this cake. 
3 pkg (8-ounces) cream cheese, softened
1 c butter, at room temperature
6 c powdered sugar
1 Tbsp vanilla extract
1/4 c cream
Frosting directions:  Beat cream cheese and butter together until smooth. Add the vanilla and the sugar beating until smooth. Gradually add the cream until the frosting looks whipped and creamy. If necessary you could add a little more cream to make it easier to spread.

 Also if you check out Juniors Cheesecake Cookbook, there is another awesome version of Strawberry Shortcake Cheesecake

Read more...

Coconut Chicken Strips

Wednesday, September 28, 2011

These crispy homemade chicken strips have just a subtle hint of coconutty sweetness to them that makes them perfect for dipping in a sweet and sour sauce.  I made some of them baked and the others fried and either way, my family devoured them like hungry hyenas.  The baked version wasn't quite as crisp or golden as the fried version, but they still tasted excellent and would be perfect for those with an aversion to frying.  My hubby recommends some Polynesian sauce from Chick-fil-a as a dipping sauce, but any sweet and sour type sauce would be perfect.  :)  

Recipe Adapted from Budget Bytes

Click here for printable recipe. 


The ingredients:


2 lbs. boneless, skinless chicken breasts  (about 3-4 large breasts)
3/4 cup flour
1 tsp. salt
3 large eggs
1/2 cup coconut milk
1-1/2 cups plain bread crumbs
1-1/2 cups shredded coconut, pulsed in the blender
1/2 cup vegetable oil, divided  (oil is not needed if baking instead of frying)
1 cup sweet and sour sauce (or sweet chili sauce)

Directions: 
Trim fat from chicken and cut each breast diagonally into 6 thin strips.  Prepare your breading station by gathering 3 medium size bowls.  In the first bowl, combine the flour and salt.  In the second bowl, combine the eggs and coconut milk and whisk together until well combined.  In the third bowl, stir together the plain bread crumbs and pulsed shredded coconut. 


Dredge the chicken strips in the flour/salt mixture, then dip in the coconut milk/egg mixture.  Lastly, coat each chicken strip in bread crumb/coconut mixture.  Place on plate and set aside. 

FRYING DIRECTIONS: Heat 1/4 cup oil in a large heavy duty skillet over medium/high heat.  When oil is hot (when a small pinch of flour will sizzle when sprinkled over oil), and place 6 coated chicken strips in the hot oil at once, taking care to make sure none of the strips are touching each other.  Fry the strips for 2-3 minutes on each side or until they are golden brown and crispy.  When strips are done, use tongs (or 2 spatulas) to remove the chicken and place on a paper towel lined plate.  Cook subsequent batches in the same manner, adding oil and allowing it to reheat when necessary.  NOTE: If you have opted not to cut your chicken into thin strips, then you will need to bake the chicken after frying in order to ensure that it is cooked all the way through. 


BAKING DIRECTIONS:  Place chicken strips in baking pan (take care to make sure they're not touching) and bake uncovered at 400 degrees for 20 minutes or until golden brown and cooked through.    NOTE:  Baking time will be longer, if you did not cut the chicken into strips before cooking. 

Serve hot with sweet and sour sauce or sweet chili sauce. 

Enjoy! 


Don't miss a single recipe at Recipe Shoebox.  Sign up for free email updates on the right. 

Read more...

Frog Eye Salad

Tuesday, September 27, 2011

Frog eye salad is such a weird name for food. I had never heard of Frog eye salad until I met my future in-laws and it's too bad because it's such a yummy fruit salad. I imagine that it's called 'frog eye' because the little acini de pepe pasta are little tiny balls that resemble eyes. It's easy to make and makes a great fruit salad to take to group outings when you need to serve a lot. That is if you make a full batch , which I do because we will eat it all within a few days.  If you don't need to feed an army, then it's easy peasy to half the recipe.  
Click here for printable recipe. 


The Ingredients:


1 box (16-ounces) acini de pepe pasta (I couldn't find any here so I used the smallest pasta I could find)
1 large box (8-serving size) instant vanilla pudding
3 cans (11-ounces each) mandarin oranges
2 cans (20-ounces each)  crushed pineapple
1 carton (16-oz.) Cool Whip 
1 package (10-ounces) mini marshmallows (get the colored kind if you can find them!)
Other optional fruit like maraschino cherries, grapes, diced pears/peaches, or even coconut

The Directions:
Start water to boil and cook pasta to al dente (cooked, but still firm). You don't want squishy pasta!

Drain juices of canned fruit into large bowl. Sprinkle pudding mix into bowl and whisk or beat until mostly smooth.He is whisking so fast you can't even see the bottom of the whisk!
Drain pasta and cool it off slightly. Add to pudding mixture and mix well.Add fruit and mix in.Fold in Cool Whip gently so it's all incorporated.
Add marshmallows and mix well.
Place in refrigerator with plastic wrap covering it (make sure the plastic wrap is actually touching the top of the fruit salad)

I like to rationalize the it's good for you with the fruit, but honestly it's probably not with all the Cool Whip and marshmallows. But that doesn't stop me from eating leftovers for breakfast because it's so good!  (And so easy even a child can do it!)

Enjoy!

Read more...

Cheese Tortellini Pesto Pasta Salad

Thursday, September 22, 2011

  Lemon chicken---too tart.  Cottage meatloaf---great flavor, but fell apart into a pile of goulash.  S'more cookies--average.  Apple mac and cheese---weird.  BLT pasta--needs tweaking.  Basil mashed potatoes---blah. 

After a summer of eating old-favorite foods almost every night, I was excited for school to start, so I could get a little wild and crazy in the kitchen again.  But alas, after trying dud after dud after dud over the last few weeks, my culinary bravado is starting to wane.  Thank goodness for this one bright shining star recipe in among all those other lackluster dishes, or I'd be ready to throw in the towel.   Er, at least throw down my cookbooks and buy myself a new one. 

 With its classic garlic, basil, and cheese flavors, I'm putting this pasta salad on my list of dishes that would be great to serve at a potluck.   
A couple of my picky kids picked the tomatoes out of their servings, but had no trouble gobbling up the rest of it.    Don't worry if you end up with some leftovers...this was just as tasty the next day!   Makes for a great vegetarian main dish or a hearty side dish to go along with some grilled meat.  Enjoy!

Recipe Source:  Worldwide Ward Cookbook:  Secret Recipes

Click here for printable recipe. 

The ingredients:

8-oz. rotini pasta
1 pkg. (20-ounces) cheese filled tortellini (find in the refrigerated or frozen section)
1 can (14-ounces) artichoke hearts, drained, chopped
1 pkg. (10-ounces) grape tomatoes, halved lengthwise
1 can (6-ounces) black olives, drained, halved lengthwise
1 green bell pepper, diced
1/3 cup olive oil
1/4 cup Parmesan cheese, grated
1 jar (8-ounces) basil pesto (I used 1 cup of fresh pesto)
1/2 tsp. salt
2 tsp. fresh garlic, minced
12-ounces mozzarella cheese, cubed

Directions:  Cook pastas in boiling water as directed on package; set aside to drain and cool.  In a large bowl, combine all remaining ingredients, folding gently until well mixed.  Gently fold in pastas. 

Add additional salt, pesto, or olive oil if desired.  Serve immediately or refrigerate until ready to serve.  If you make this a day ahead, you may need to add a bit more olive oil, salt, and Parmesan cheese before serving.  Serve at room temperature.  Makes 10-12 servings.  Enjoy! 


Don't miss a single recipe at Recipe Shoebox.  Sign up for free email updates on the right. 

Read more...

Goat Cheese and Herb Stuffed Chicken

Monday, September 19, 2011

Years ago a friend of mine made this for dinner. I loved it instantly. I had her tell me how it was done, and over the years I have made it many times. It sounds fancy and tastes great. So it's great for company. Especially when served aside a good peasant bread or roasted vegetables. You'll feel like you're in a fancy restaurant. But even better, is that it is so simple to make. One could easily make it without a sauce and it would be fine. If you're not a fan of goat cheese (chevre) or you can't find it in your store (although you should be able to), then you could use feta cheese instead.

Click here for printable recipe. 

The Ingredients:
3-4 chicken breasts (depending on how many people you're serving. Use 1 breast per person)
1 package goat cheese (get it in the cylinder tube)
Italian seasoning, thyme, rosemary, or other flavorful dried herbs (about 1 tsp per chicken)
toothpicks

For sauce:
1 small onion
2 Tbsp butter
1 cup cream

The Directions:
Slice chicken breasts mostly through, but not all the way so you can create a pocket. Try to slice it so that there is even thickness all around.
Slice small rounds of the goat cheese. (about 1/2 inch thick). You'll need one slice per breast. Spread cheese evenly into pocket.Sprinkle herbs into pocket. The first time I had this my friend used dried rosemary. I personally love Herbs de Provence (if you can find them). But Italian seasoning or even just Thyme works great. It depends on what you like best.Secure pocket with toothpicks. I recommend sticking them perpendicular to the pocket opening as shown below instead of threading it. I threaded one with a toothpick and when it was cooked it was really hard to get out.Brown both sides of chicken in hot skillet on stove. Once browned transfer to oven safe pan and finish cooking chicken in oven (about 20 minutes depending on thickness of your chicken). Or if you're really comfortable with cooking chicken on the stove then cover it and cook it on the stove top until chicken is cooked through. I usually do the oven because I'm used to it. If you don't want to brown it, then by all means you can cook it entirely in the oven for about 1/2 hour. If you want to make a sauce to go with it I advice using a skillet that can also go in the oven. (less dishes to wash that way!) Once the chicken is cooked all the way, you can serve it now, or continue with a sauce. (Hopefully if you're using an oven safe skillet you remembered to use an oven mitt to remove said pan from the oven. Let me tell you how much it hurts all over your hand when you forget and grab hold of that hot handle.) Anyway, remove the chicken from the pan and cover with foil while you prepare the sauce.
Melt butter in skillet and add chopped onions. Sautée until brown.
Add cream to pan and stir until slightly thickened. Add more herbs, salt, or pepper for taste.Add chicken back to pan and serve immediately.

Read more...

Chunky Apple Cake with Butterscotch Sauce

Wednesday, September 14, 2011

This is one of those recipes that I'm not sure would have caught my eye, except for my 8-year-old perusing my cooking magazines/books and bookmarking it for me to try.  Then when I didn't make it fast enough for him, he volunteered to make it for us.  I had to help him with the butterscotch sauce, but thanks to the help of our awesome apple peeler/corer/slicer he did the whole cake by himself and let me take pictures of the process along the way! Despite it not being a recipe I chose myself, it turned out fabulously anyway.  It had great autumn flavor and and the butterscotch sauce topped off the moist apple-filled cake just perfectly! 


Source:  Taste of Home
Click here for printable recipe.


The ingredients:

APPLE CAKE:

1/2 cup butter, softened
2 cups sugar
2 eggs
1/2 tsp. vanilla extract
2 cups all-purpose flour
1-1/2 tsp. ground cinnamon
1 tsp. ground nutmeg
1/2 tsp. salt
1/2 tsp. baking soda
6 cups chopped peeled tart apples (it ended up being about 4 large Granny Smith apples)

BUTTERSCOTCH SAUCE:

1/2 cup packed brown sugar
1/4 cup butter, cubed
1/2 cup heavy whipping cream


Directions: 

For Apple Cake, in a large bowl, cream butter and sugar until light and fluffy.  Add eggs, one at a time, beating well after each addition.  Beat in vanilla.  Combine flour, cinnamon, nutmeg, salt, and baking soda, gradually add to creamed mixture and mix well (batter will be stiff).  Stir in apples (it will seem like a lot of apples). 

Spread into a greased 9x13-inch baking dish.  Bake at 350 degrees for 40-45 minutes or until top is lightly browned and springs back when lightly touched.  Cool for 30 minutes before serving. 
For Butterscotch Sauce, combine brown sugar and butter in a small saucepan.  Cook over medium heat until butter is melted.  Gradually add cream.  Bring to a slow boil over medium heat, stirring constantly .  Remove from heat.

Serve cake with warm butterscotch sauce and a dollop of whipped cream.  Enjoy!  


Don't miss a single recipe here at Recipe Shoebox.  Sign up for free email updates on the right. 

Read more...

About This Blog

My name is Lara and while I'm definitely not a gourmet cook, I do love preparing tasty, healthy meals for my family. Finding new recipes to try and sharing the ones we've already fallen in love with is a passion I've had since college and the reason why I've started this blog! With five kids, I'm usually in a hurry, so you'll find most of these recipes kid friendly and simple to make.

  © Blogger template On The Road by Ourblogtemplates.com 2009

Back to TOP